Peekaboo Mouse Granny Square — A Playful Beginner Appliqué
Stitch a sweet Peekaboo Mouse granny square in cream, dove grey, and blush pink — five easy rounds plus a border, perfect for beginner crocheters.
About this pattern
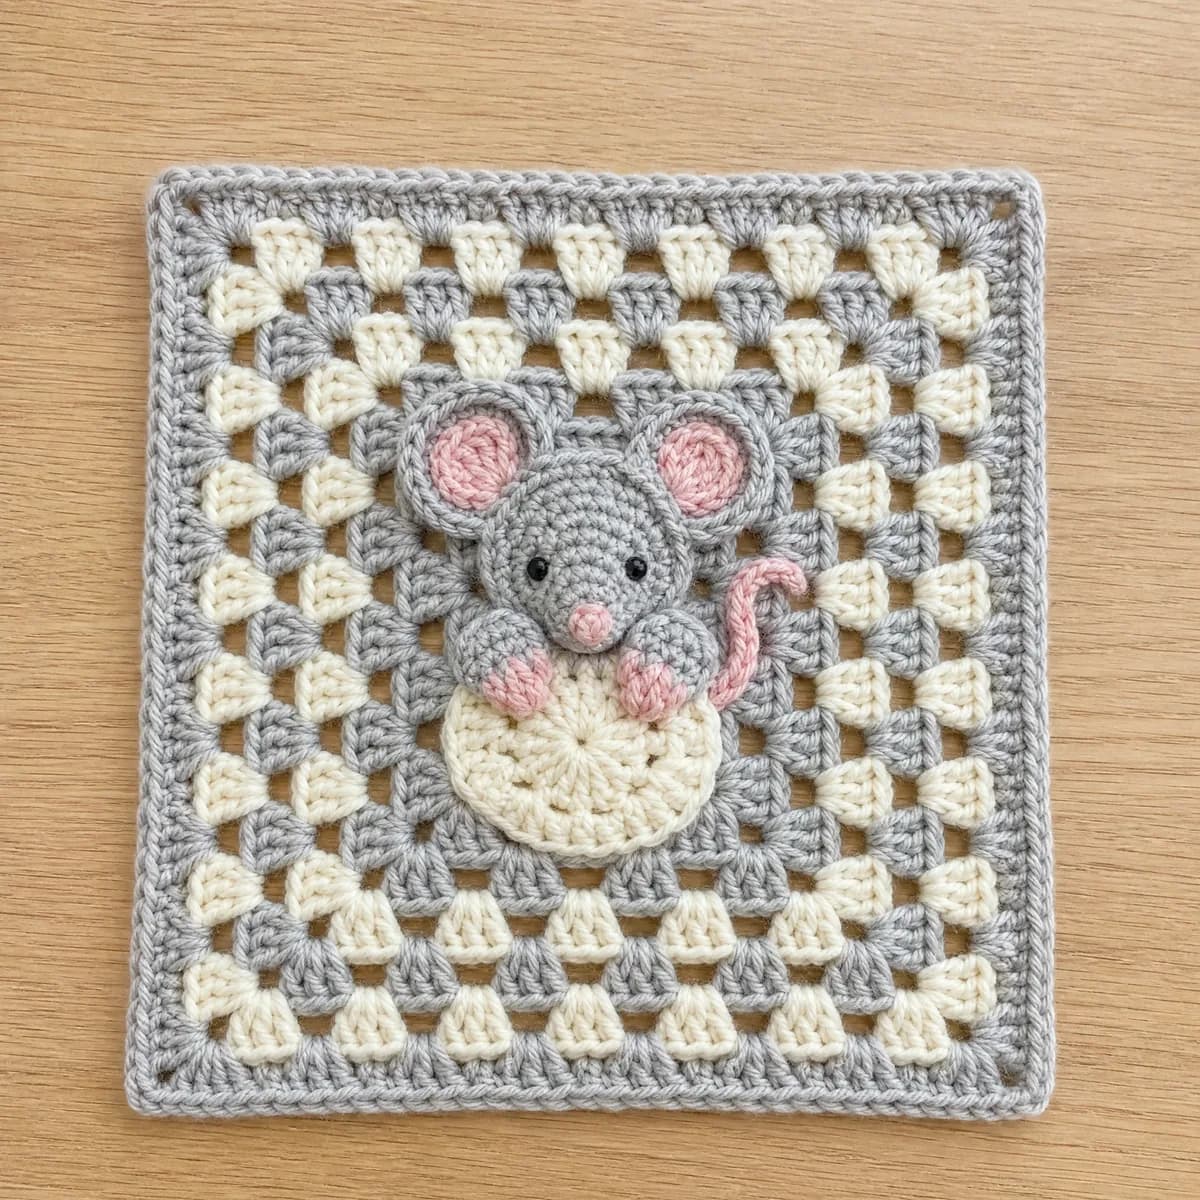
The Peekaboo Mouse Granny Square is a classic granny worked in soft cream, dove grey, and blush pink, with a tiny appliquéd mouse - head, big overlapping ears, dainty inner ears, snout, and nose - stitched on top so she looks like she's peeking out from the corner. It's the kind of square that turns a simple background into a little scene, without asking you to learn anything unfamiliar.
You'll work four classic granny rounds plus a border, all in standard double crochet and chain spaces, then add a handful of small appliqué pieces and tack them on with a needle and matching yarn. If you already know how to make a granny square and can sew two pieces of crochet together, you have every skill this pattern asks for - it's a lovely project for beginners who want to stretch just slightly beyond the basics.
Finished, the square measures about 6 by 6 inches, small enough to make in a sitting or two but full of personality once the mouse is in place. Make one as a stand-alone coaster or ornament for a shelf, or stitch up a whole batch to mix into a blanket, pillow, or garland where a little woodland charm feels just right.
Variations
Idea 1
Once you've made one mouse, it's easy to make her your own. Swap the blush pink for a soft caramel or honey gold and you'll land somewhere closer to a little mole or bear face instead. A grey and white palette gives a more silvery, storybook mouse, while a deeper charcoal background makes the cream snout pop even more. If you'd like the finished square smaller, drop to a size D or E hook and a lighter weight yarn for a mouse who could tuck into a keychain or ornament; go up to a chunky yarn and larger hook if you want an oversized pillow-front mouse instead. However you style her, the same rounds and appliqué shapes carry the whole design.
Idea 2
I fell for this square the moment I sewed on those ears. There's something about a big overlapping ear peeking past a smaller inner ear that makes a plain granny feel like it has a personality of its own. The base rounds are pure comfort - the same corner-and-chain rhythm you already know - so all your attention goes toward the fun part: shaping that sweet round face and setting the nose just so. I love that it looks like it took real skill, when really it's just a granny square with a little extra love stitched on top. It's become one of my favorite squares to keep in a basket for slow evenings.
Common mistakes
Losing the corner chain spaces
Each corner needs its own ch-2 space to keep the square flat - working into the wrong spot pulls the corners tight and makes them curl. Count your 3-dc groups after every round to make sure each corner still has its own space.
Sewing the ears on flat
The mouse's charm comes from those big ears overlapping the smaller inner ears, so tack the outer ear down first and let the inner ear sit slightly on top rather than side by side. Pinning both pieces before you sew keeps the layers from sliding.
Skipping a stitch count check
It's easy to lose a stitch inside the repeated chain-1 spaces on the later rounds without noticing. Pause at the end of each round and check your total against the number in parentheses before moving on.
Rushing the snout placement
If the snout and nose go on before you've settled where the head sits, the whole face can end up off-center. Lay all the appliqué pieces on the square and pin them in place first, then step back and check the balance before you thread a needle.
Materials & abbreviations
Materials
- Worsted-weight yarn in 3 colors (cream, dove grey, blush pink) — about 25–40 g total per square
- 5.0 mm crochet hook
- Yarn needle for weaving in ends
- Scissors
Abbreviations
- ch
- chain
- dc
- double crochet
- sc
- single crochet
- sl st
- slip stitch
- sp
- space
- st(s)
- stitch(es)
- rnd
- round
- MR
- magic ring
Main pattern
The Background Square — Round 1
With cream, in a magic ring: ch 3, 2 dc, ch 2, [3 dc, ch 2] 3 times; sl st to top of ch-3 to join (12)
- Using cream yarn, in a magic ring: make 3 chain stitches, 2 double crochet, make 2 chain stitches, [3 double crochet, make 2 chain stitches] 3 times; slip stitch to top of ch-3 to join.
Tip Work the plain background square first — the peekaboo mouse pieces are sewn on at the end. Every count below is math-verified.
The Background Square — Round 2
sl st to corner sp, ch 3, 2 dc, ch 2, 3 dc in same corner, ch 1, [(3 dc, ch 2, 3 dc) in corner sp, ch 1, ] 3 times; sl st to join (24)
- Slip stitch to corner space, make 3 chain stitches, 2 double crochet, make 2 chain stitches, 3 double crochet in same corner, make 1 chain stitch, [(3 double crochet, make 2 chain stitches, 3 double crochet) in corner space, make 1 chain stitch, ] 3 times; slip stitch to join.
The Background Square — Round 3
With dove grey, sl st to corner sp, ch 3, 2 dc, ch 2, 3 dc in same corner, ch 1, 3 dc, ch 1, [(3 dc, ch 2, 3 dc) in corner sp, ch 1, 3 dc, ch 1, ] 3 times; sl st to join (36)
- Using dove grey yarn, slip stitch to corner space, make 3 chain stitches, 2 double crochet, make 2 chain stitches, 3 double crochet in same corner, make 1 chain stitch, 3 double crochet, make 1 chain stitch, [(3 double crochet, make 2 chain stitches, 3 double crochet) in corner space, make 1 chain stitch, 3 double crochet, make 1 chain stitch, ] 3 times; slip stitch to join.
The Background Square — Round 4
sl st to corner sp, ch 3, 2 dc, ch 2, 3 dc in same corner, ch 1, 3 dc, ch 1, 3 dc, ch 1, [(3 dc, ch 2, 3 dc) in corner sp, ch 1, 3 dc, ch 1, 3 dc, ch 1, ] 3 times; sl st to join (48)
The Background Square — Border
With cream, sl st into the corner ch-2 sp, ch 1, [3 sc in the corner sp, (sc in next 3 sts, sc in next sp) 3 times, sc in next 3 sts] 4 times; sl st to the first sc (72)
- Using cream yarn, slip stitch into the corner ch-2 space, make 1 chain stitch, [3 single crochet in the corner space, (single crochet in next 3 stitches, single crochet in next space) 3 times, single crochet in next 3 stitches] 4 times; slip stitch to the first single crochet.
The Background Square — Additional guidance
Slip stitch to corner space, make 3 chain stitches, 2 double crochet, make 2 chain stitches, 3 double crochet in same corner, make 1 chain stitch, 3 double crochet, make 1 chain stitch, 3 double crochet, make 1 chain stitch, [(3 double crochet, make 2 chain stitches, 3 double crochet) in corner space, make 1 chain stitch, 3 double crochet, make 1 chain stitch, 3 double crochet, make 1 chain stitch, ] 3 times; slip stitch to join.
The Head — Round 1
6 sc in a magic ring (6)
Tip Worked in dove grey. Leave a long tail for sewing.
The Head — Round 2
[inc] repeat 6 times (12)
The Head — Round 3
[sc, inc] repeat 6 times (18)
The Head — Round 4
[sc, sc, inc] repeat 6 times (24)
The Ears (make 2) — Round 1
6 sc in a magic ring (6)
Tip Worked in dove grey. Leave a long tail for sewing.
The Ears (make 2) — Round 2
[inc] repeat 6 times (12)
The Inner Ears (make 2) — Round 1
6 sc in a magic ring (6)
Tip Worked in blush pink. Leave a long tail for sewing.
The Snout — Round 1
6 sc in a magic ring (6)
Tip Worked in cream. Leave a long tail for sewing.
The Snout — Round 2
[inc] repeat 6 times (12)
The Nose — Round 1
6 sc in a magic ring (6)
Tip Worked in blush pink. Leave a long tail for sewing.
Assembly — Bringing It Together — Step 1
Step 1: Pin the two Ears to the top corners of the background square first, tips pointing outward and up, so about half of each ear peeks above where the Head will sit.
Assembly — Bringing It Together — Step 2
Step 2: Center the Head over the square, overlapping the lower half of each Ear so only the top curve of each ear shows above the Head. Whip stitch the Head's outer round to the background all the way around, tacking through the overlapped ear edges as you go.
Assembly — Bringing It Together — Step 3
Step 3: Sew each Inner Ear centered inside its Ear circle with small whip stitches.
Assembly — Bringing It Together — Step 4
Step 4: Pin the Snout to the lower-center third of the Head and whip stitch it down.
Assembly — Bringing It Together — Step 5
Step 5: Sew the Nose centered on the upper edge of the Snout.
Assembly — Bringing It Together — Step 6
Step 6: Embroider the eyes above the Snout, then the whiskers and optional smile, referencing the embroidery notes.
Assembly — Bringing It Together — Embroidery
Two small straight-stitch eyes in dove grey (or a dark scrap), placed side by side above the snout
Assembly — Bringing It Together — Embroidery
Three short straight-stitch whiskers on each side of the snout, fanning outward
Assembly — Bringing It Together — Embroidery
A tiny V-shaped straight stitch under the nose for a smile, optional
Important notes
Gauge: the finished square is about 6 x 6 inches in Worsted weight yarn with a 5.0 mm hook. Tight crocheters can go up half a hook size; loose ones down half.
Color plan: the sample uses cream, dove grey, blush pink in round order — change colors with a slip-stitch join in the first stitch of the new round.
Weave in your ends as you finish each round instead of leaving them all for last - with this many color and piece changes, a little tidying along the way saves real time later.
Steam or lightly block the finished square before sewing on the mouse pieces so the corners lie flat and the appliqué has an even surface to sit on.
Frequently asked questions
I used a worsted weight yarn with a 5.0 mm hook, which gives a nice firm fabric that holds the appliqué shapes well. Any worsted weight yarn you enjoy working with should give you similar results, just check your square measures close to 6 inches.
Just basic hand sewing - a whipstitch or running stitch with a yarn needle is all it takes to attach the ears, snout, and nose. If you can thread a needle and stitch two pieces of fabric together, you already have the skill you need.
Absolutely, and it's one of the easiest ways to make this square your own. Just keep the snout in a light, contrasting shade so the little face still reads clearly against the head.
Yes, since the background uses three colors and the mouse pieces are small, it's a great project for digging into your stash. Just make sure your scraps are a similar weight so the stitches stay even.
That depends on the size you're after, but since each square finishes around 6 by 6 inches, you can multiply that against your desired blanket dimensions to get a rough count. A lap-size blanket usually falls somewhere around 48 to 63 squares, arranged 6 or 7 across and 7 or 9 down.