Blushing Peach Granny Square — A Sun-Warmed Fruit Appliqué
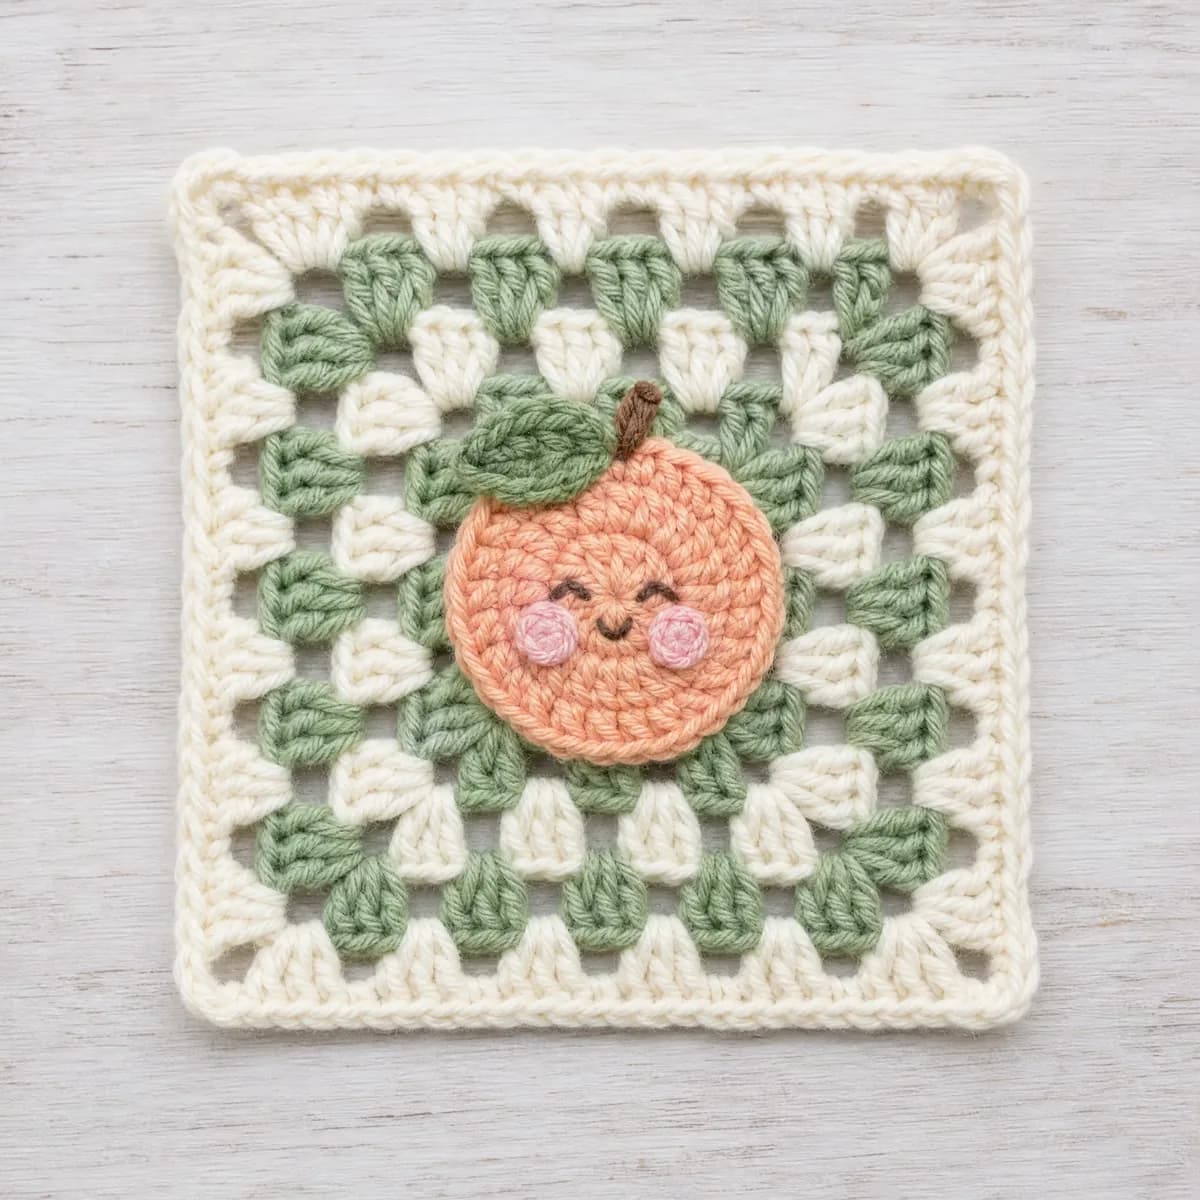
A beginner-friendly granny square in cream, sage, peach and blush, finished with a sewn-on peach appliqué and leaf across seven rounds plus a border.
About this pattern
The Blushing Peach Granny Square starts out as a classic square — cream and sage rounds building outward from a magic ring in the familiar three-double-crochet, corner-space rhythm most crocheters already know. What sets it apart is what happens after those rounds are done: a small peach, complete with its own blush-toned patch and a single leaf, gets sewn on top like it just rolled off a sun-warmed branch. It's a classic square with a pictorial twist, built to look playful without asking for any unusual stitches.
Everything here uses standard granny square technique — a magic ring start, chain-2 corners, chain-1 spaces between groups, and color changes worked at the join. The peach, blush patch, and leaf are worked as separate small pieces and stitched into place once the background square is finished, so you're never juggling more than one color or piece at a time. That makes this a comfortable project for a beginner who's made a square or two before and is ready to add a little shape and color play, as well as for a more experienced crocheter who wants a quick, satisfying appliqué to stitch up between bigger projects.
Finished, the square measures about 8 by 8 inches, with the sage border framing the cream-and-sage background and the peach sitting slightly off-center like it landed there on its own. One square makes a sweet little wall piece or a pillow front on its own, and a stack of them — mixed with plain squares or on their own — builds into a warm, orchard-toned blanket or a set of coordinating home pieces.
Variations
Idea 1
If peach isn't your fruit, this shape adapts easily — swap the palette for a soft yellow with a red blush for an apple, or dusty orange with cream for an apricot, keeping the same background rounds in whatever two colors you love together. You can also drop the appliqué altogether and let the plain square stand on its own in a bolder color combination. Working the base in a lighter weight yarn with a smaller hook shrinks it down for coasters or garland pieces, while a chunky yarn and larger hook turns it into an oversized single-square pillow front. However you change it, keep the corner spaces consistent from round to round so the shaping stays square and the appliqué — if you keep it — has a flat, even surface to sit on.
Idea 2
I love this one because it doesn't stop at being a pretty granny square — it gets to be a little scene. The base rounds build up in cream and sage the way any classic square does, sturdy and satisfying, and then the peach comes along and turns the whole thing into something you want to pick up and look at twice. That blush patch is my favorite detail; it's the kind of thing that makes people lean in and ask how you did it. It's forgiving to make, it photographs beautifully in a stack, and it's proof that a beginner square can still feel like a finished, considered piece.
Common mistakes
Joining new colors sloppily
Attach cream and sage with a clean join in the corner space and weave ends in as you go, so the color changes stay crisp instead of lumpy on the back.
Skipping a blocking step
Give the square a light steam or wet block before you sew on the peach appliqué; a flat, square base keeps the fruit sitting evenly instead of puckering.
Losing the corner spaces
Each round's corners need to line up directly above the round before it; count corners before you join so the square stays true and square.
Sewing the appliqué too tight
Tack the peach, blush patch, and leaf on with a relaxed running stitch rather than pulling snug, so the piece keeps its soft, rounded shape instead of flattening.
Materials & abbreviations
Materials
- Worsted-weight yarn in 5 colors (cream, sage, peach, blush, leaf green) — about 25–40 g total per square
- 5.0 mm crochet hook
- Yarn needle for weaving in ends
- Scissors
Abbreviations
- ch
- chain
- dc
- double crochet
- sc
- single crochet
- sl st
- slip stitch
- sp
- space
- st(s)
- stitch(es)
- rnd
- round
- MR
- magic ring
Main pattern
The Background Square — Round 1
With cream, in a magic ring: ch 3, 2 dc, ch 2, [3 dc, ch 2] 3 times; sl st to top of ch-3 to join (12)
- Using cream yarn, in a magic ring: make 3 chain stitches, 2 double crochet, make 2 chain stitches, [3 double crochet, make 2 chain stitches] 3 times; slip stitch to top of ch-3 to join.
Tip Work the plain background square first — the blushing peach pieces are sewn on at the end. Every count below is math-verified.
The Background Square — Round 2
sl st to corner sp, ch 3, 2 dc, ch 2, 3 dc in same corner, ch 1, [(3 dc, ch 2, 3 dc) in corner sp, ch 1, ] 3 times; sl st to join (24)
- Slip stitch to corner space, make 3 chain stitches, 2 double crochet, make 2 chain stitches, 3 double crochet in same corner, make 1 chain stitch, [(3 double crochet, make 2 chain stitches, 3 double crochet) in corner space, make 1 chain stitch, ] 3 times; slip stitch to join.
The Background Square — Round 3
With sage, sl st to corner sp, ch 3, 2 dc, ch 2, 3 dc in same corner, ch 1, 3 dc, ch 1, [(3 dc, ch 2, 3 dc) in corner sp, ch 1, 3 dc, ch 1, ] 3 times; sl st to join (36)
- Using sage yarn, slip stitch to corner space, make 3 chain stitches, 2 double crochet, make 2 chain stitches, 3 double crochet in same corner, make 1 chain stitch, 3 double crochet, make 1 chain stitch, [(3 double crochet, make 2 chain stitches, 3 double crochet) in corner space, make 1 chain stitch, 3 double crochet, make 1 chain stitch, ] 3 times; slip stitch to join.
The Background Square — Round 4
sl st to corner sp, ch 3, 2 dc, ch 2, 3 dc in same corner, ch 1, 3 dc, ch 1, 3 dc, ch 1, [(3 dc, ch 2, 3 dc) in corner sp, ch 1, 3 dc, ch 1, 3 dc, ch 1, ] 3 times; sl st to join (48)
The Background Square — Round 5
With cream, sl st to corner sp, ch 3, 2 dc, ch 2, 3 dc in same corner, ch 1, 3 dc, ch 1, 3 dc, ch 1, 3 dc, ch 1, [(3 dc, ch 2, 3 dc) in corner sp, ch 1, 3 dc, ch 1, 3 dc, ch 1, 3 dc, ch 1, ] 3 times; sl st to join (60)
The Background Square — Round 6
sl st to corner sp, ch 3, 2 dc, ch 2, 3 dc in same corner, ch 1, 3 dc, ch 1, 3 dc, ch 1, 3 dc, ch 1, 3 dc, ch 1, [(3 dc, ch 2, 3 dc) in corner sp, ch 1, 3 dc, ch 1, 3 dc, ch 1, 3 dc, ch 1, 3 dc, ch 1, ] 3 times; sl st to join (72)
The Background Square — Border
With sage, sl st into the corner ch-2 sp, ch 1, [3 sc in the corner sp, (sc in next 3 sts, sc in next sp) 5 times, sc in next 3 sts] 4 times; sl st to the first sc (104)
- Using sage yarn, slip stitch into the corner ch-2 space, make 1 chain stitch, [3 single crochet in the corner space, (single crochet in next 3 stitches, single crochet in next space) 5 times, single crochet in next 3 stitches] 4 times; slip stitch to the first single crochet.
The Background Square — Additional guidance
Slip stitch to corner space, make 3 chain stitches, 2 double crochet, make 2 chain stitches, 3 double crochet in same corner, make 1 chain stitch, 3 double crochet, make 1 chain stitch, 3 double crochet, make 1 chain stitch, [(3 double crochet, make 2 chain stitches, 3 double crochet) in corner space, make 1 chain stitch, 3 double crochet, make 1 chain stitch, 3 double crochet, make 1 chain stitch, ] 3 times; slip stitch to join.
The Background Square — Additional guidance
Using cream yarn, slip stitch to corner space, make 3 chain stitches, 2 double crochet, make 2 chain stitches, 3 double crochet in same corner, make 1 chain stitch, 3 double crochet, make 1 chain stitch, 3 double crochet, make 1 chain stitch, 3 double crochet, make 1 chain stitch, [(3 double crochet, make 2 chain stitches, 3 double crochet) in corner space, make 1 chain stitch, 3 double crochet, make 1 chain stitch, 3 double crochet, make 1 chain stitch, 3 double crochet, make 1 chain stitch, ] 3 times; slip stitch to join.
The Background Square — Additional guidance
Slip stitch to corner space, make 3 chain stitches, 2 double crochet, make 2 chain stitches, 3 double crochet in same corner, make 1 chain stitch, 3 double crochet, make 1 chain stitch, 3 double crochet, make 1 chain stitch, 3 double crochet, make 1 chain stitch, 3 double crochet, make 1 chain stitch, [(3 double crochet, make 2 chain stitches, 3 double crochet) in corner space, make 1 chain stitch, 3 double crochet, make 1 chain stitch, 3 double crochet, make 1 chain stitch, 3 double crochet, make 1 chain stitch, 3 double crochet, make 1 chain stitch, ] 3 times; slip stitch to join.
The Peach — Round 1
6 sc in a magic ring (6)
Tip Worked in peach. Leave a long tail for sewing.
The Peach — Round 2
[inc] repeat 6 times (12)
The Peach — Round 3
[sc, inc] repeat 6 times (18)
The Peach — Round 4
[2 sc, inc] repeat 6 times (24)
The Blush Patch — Round 1
6 sc in a magic ring (6)
Tip Worked in blush. Leave a long tail for sewing.
The Blush Patch — Round 2
[inc] repeat 6 times (12)
The Leaf — Round 1
ch 9, sc in 2nd ch from hook, sc in next 6 sts, 3 sc in last ch, working back along the underside sc in next 6 sts, 2 sc in last (18)
Tip Worked in leaf green. Leave a long tail for sewing.
Assembly — Bringing It Together — Step 1
Weave in all yarn ends on the Peach, Blush Patch, and Leaf before assembling.
Assembly — Bringing It Together — Step 2
Lay the Peach right-side up and pin the Blush Patch to its upper-right area, overlapping the edge slightly so it reads as shading rather than a separate circle; whipstitch it in place around its outer edge.
Assembly — Bringing It Together — Step 3
Pin the finished Peach slightly below and left of center on the background square, leaving open space above it for the leaf and stem.
Assembly — Bringing It Together — Step 4
Sew the Peach to the background using an invisible whipstitch through the back loops of its final round, stuffing isn't needed since this is a flat appliqué.
Assembly — Bringing It Together — Step 5
Position the Leaf's base point just above the peach's stem embroidery spot, angled up and out to the right; pin it flat.
Assembly — Bringing It Together — Step 6
Sew the Leaf down through its center row and around its edge, catching the background fabric so it lies flat.
Assembly — Bringing It Together — Embroidery
With leaf green, work 3-4 short straight stitches stacked vertically at the top of the peach to form a tiny stem where the leaf will attach.
Assembly — Bringing It Together — Embroidery
With blush, scatter 4-5 short straight stitches in a loose cluster on the upper side of the peach for natural blush shading.
Assembly — Bringing It Together — Embroidery
With peach, work one short straight stitch down from the top center about 1cm to suggest the peach's natural cleft line.
Important notes
Gauge: the finished square is about 8 x 8 inches in Worsted weight yarn with a 5.0 mm hook. Tight crocheters can go up half a hook size; loose ones down half.
Color plan: the sample uses cream, sage, peach, blush, leaf green in round order — change colors with a slip-stitch join in the first stitch of the new round.
Since the base rounds swap between cream and sage every couple rounds, work over your color-change tails as you go instead of weaving them in at the end — it saves time and keeps the back tidy under the appliqué.
Use the same worsted weight yarn and 5.0 mm hook for the peach, blush patch, and leaf as you did for the background, so every piece has matching drape and sits flat once it's sewn on.
Frequently asked questions
Yes — the background square uses only standard granny square stitches worked in worsted weight yarn with a 5.0 mm hook, so if you've made one classic square before, you're ready. The peach appliqué is small and forgiving to sew on.
Because each square uses small amounts of five colors, a partial skein of each is usually plenty; the appliqué pieces use only scraps of peach, blush, and leaf green.
Once the background square and the appliqué pieces are finished, pin the peach in place with the blush patch and leaf tucked where you like them, then sew around the edges with a needle and matching yarn.
Yes — the finished square is worked with the same corner and edge structure as any classic granny square, about 8 by 8 inches, so it joins easily with matching or plain squares using your preferred join.
No — the peach, blush patch, and leaf are all worked with the same basic stitches as the background rounds; the only new skill is sewing the finished pieces onto the square.