Eight-Point Wheel Doily — Free 8-Round Crochet Lace Pattern
Free 8-round crochet doily pattern in US terms. A spoked wheel centre opens into eight fans, each gathered to a point with a dc5tog cluster and finished with a picot scallop. Every stitch count machine-verified.
About this pattern
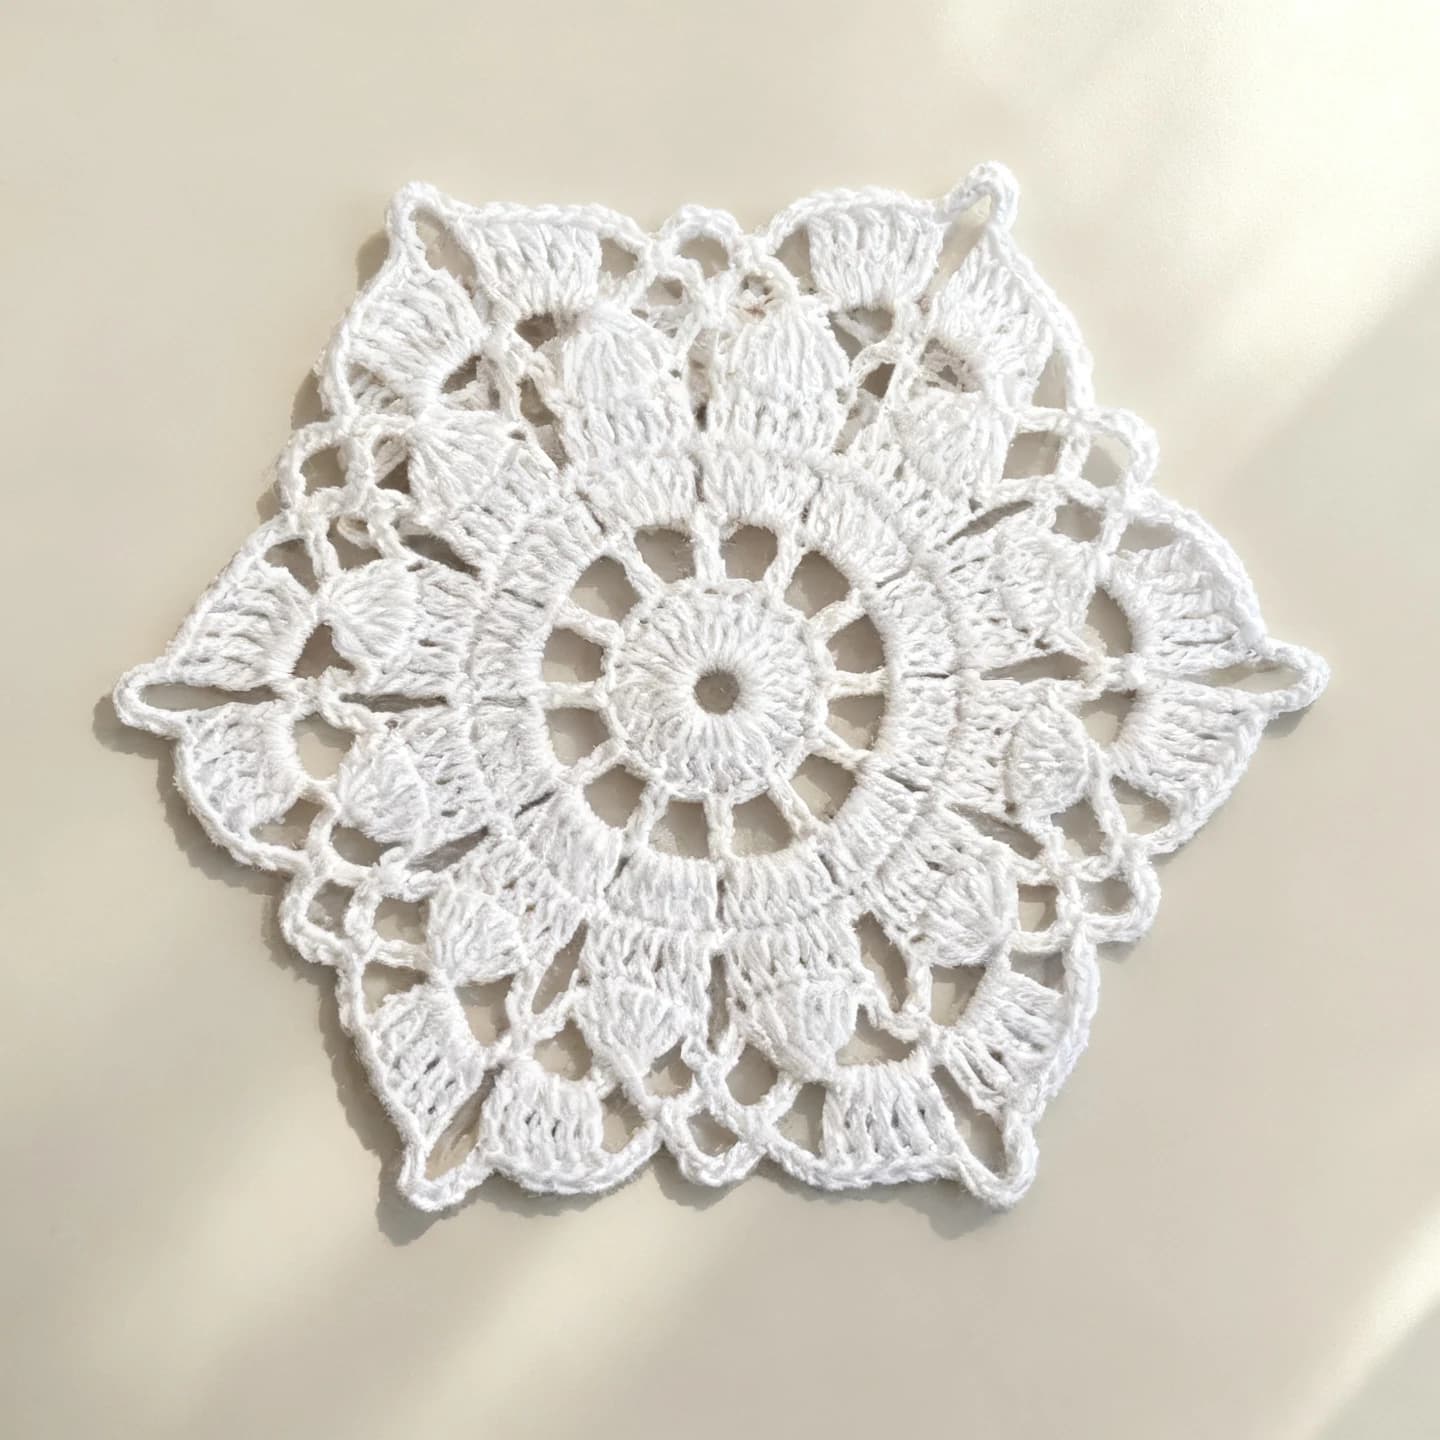
This is a classic round thread doily built the way lace doilies have always been built: outward from the centre in joined rounds, each one closed with a slip stitch rather than spiralling. The centre is a solid wheel of double crochet spokes. Round four opens it up into sixteen chain arches, and those arches become the eight fans that give the doily its body.
The character comes from round six. Each fan is gathered at the top by a dc5tog — five double crochet worked together into a single stitch — which pulls the fan into a point. Eight clusters, eight points. Everything after that is edging: eleven single crochet over each arch to round the scallops, then a picot every fourth stitch for the beaded finish.
Worked in size 10 cotton it finishes at about 16 cm across the points and wants a firm block. Worked in worsted-weight yarn with a 4 mm hook the same eight rounds give you a placemat of roughly 30 cm.
Variations
Idea 1
Change the thread weight and you change the object entirely. Size 10 cotton on a 1.75 mm hook gives a 16 cm doily; DK cotton on a 3.5 mm hook gives a 25 cm mat; worsted on a 4 mm hook gives a 30 cm placemat. For a coaster set, stop after round six and work the picot edging straight onto the cluster points. Ecru instead of white reads vintage; a single deep colour reads modern.
Idea 2
There is a moment on round six when eight loose fans suddenly pull into eight sharp points, and the whole thing stops looking like a circle of holes and starts looking like lace. It happens in the space of one round. If you have never worked a cluster before, this is a good first one: dc5tog is only five double crochet left unfinished on the hook and drawn together, and the doily rewards you for it immediately.
Common mistakes
Counting the beginning chain twice
The ch-3 that opens rounds 1, 3 and 5 stands in for the first double crochet — it is not an extra stitch. Round 6 deliberately has no ch-3 at all: work the first cluster as a standing dc5tog so the round has no seam.
Working into stitches instead of spaces
From round 5 onward the fans and scallops go into the chain SPACES, not into the individual chain stitches. Working into the chains closes the lace and the doily will cup instead of lying flat.
Uneven clusters on round 6
All five loops of a dc5tog must be drawn through in one movement, with the same tension on each. If one cluster is tighter than the rest that point will sit lower than the other seven, and blocking will not hide it.
Skipping the block
Thread lace does not look like lace until it is blocked. Pin the eight points out evenly on a padded surface, spray with starch and let it dry completely. This is what turns a limp ring into a flat star.
Materials & abbreviations
Materials
- Size 10 cotton crochet thread in white — about 40 m for one doily
- 1.75 mm steel crochet hook (US size 5)
- Tapestry needle for weaving in the ends
- Rust-proof pins and spray starch or fabric stiffener for blocking
Abbreviations
- ch
- chain
- sl st
- slip stitch
- sc
- single crochet
- dc
- double crochet
- tr
- treble crochet
- dc5tog
- 5 double crochet together — makes one cluster
- sp
- space
- sk
- skip
- st(s)
- stitch(es)
Main pattern
The Doily — Round 1
In a magic ring: ch 3 (counts as the first dc), 15 dc in the ring; sl st to the top of the beginning ch-3 to join. (16)
Tip Work in joined rounds — close every round with a slip stitch into its own beginning rather than spiralling. Every count below was re-counted by machine and agrees with the pattern.
The Doily — Round 2
ch 4 (counts as dc + ch 1), [dc in the next st, ch 1] repeat 15 times; sl st to the 3rd ch of the beginning ch-4 to join. (16)
The Doily — Round 3
ch 3, 2 dc in the next ch-1 sp, [dc in the next dc, 2 dc in the next ch-1 sp] repeat 15 times; sl st to the top of the ch-3 to join. (48)
The Doily — Round 4
ch 1, sc in the same st, ch 5, sk 2 sts, [sc in the next st, ch 5, sk 2 sts] repeat 15 times; sl st to the first sc to join. (16)
- Sixteen ch-5 arches. This is the open ring on the chart that separates the wheel from the fans.
The Doily — Round 5
sl st into the next ch-5 sp, ch 3, 6 dc in the same sp, [sc in the next ch-5 sp, 7 dc in the next ch-5 sp] repeat 7 times, sc in the next ch-5 sp; sl st to the top of the ch-3 to join. (64)
- Eight fans of 7 dc, each anchored by a single sc between them. The fans are what give the doily its scalloped body.
The Doily — Round 6
sl st in the next dc, [dc5tog, ch 7] repeat 8 times; sl st to the top of the first cluster to join. (8)
The Doily — Round 7
ch 1, sc in the same st, [11 sc in the next ch-7 sp, sc in the next st] repeat 7 times, 11 sc in the next ch-7 sp; sl st to the first sc to join. (96)
- Covering each ch-7 arch with 11 sc turns the eight points into the rounded scallops of the outer edge.
The Doily — Round 8
ch 1, sc in the same st, [ch 3, sl st in the 3rd ch from the hook, sc in each of the next 3 sts] repeat 31 times, ch 3, sl st in the 3rd ch from the hook, sc in each of the next 2 sts; sl st to the first sc to join. Fasten off and weave in the ends. (96)
- A picot every fourth stitch. Thirty-two picots — four to each scallop — which is the beaded look along the finished edge.
The Doily — Additional guidance
The centre wheel. Pull the ring closed firmly — on a doily this hole shows.
The Doily — Additional guidance
The ch-1 between each dc opens the sixteen spokes you can see radiating from the centre.
The Doily — Additional guidance
Filling each ch-1 space with 2 dc widens the wheel from 16 to 48 and makes it lie flat.
The Doily — Additional guidance
Each dc5tog gathers one fan into a point — this is the 5dc-together symbol in the chart legend. Work the first cluster as a standing dc5tog so the round has no ch-3 seam.
Important notes
Gauge: rounds 1–3 should measure about 4 cm across in size 10 cotton on a 1.75 mm hook. Tight crocheters can go up to 2.0 mm.
US terms throughout. A UK crocheter should read dc as tr and sc as dc.
Block firmly. Pin the eight points out evenly, starch, and let it dry completely before unpinning.
Joining several: slip stitch the picots of one doily to the matching picots of the next as you work round 8, and they join as you go.
Frequently asked questions
No. This pattern is written out fully in US terms, round by round, with the stitch count after each one.
Five double crochet worked together into one stitch. Work each dc until two loops remain on the hook, leave it there, and after the fifth draw the yarn through all six loops at once.
Yes. Worsted-weight cotton on a 4 mm hook gives a placemat of about 30 cm from the same eight rounds.
Almost always tension on rounds 3 and 5. If it cups, the increases are too tight; if it ruffles, too loose. Blocking corrects a little, not a lot.
Confident beginner. You need the magic ring, dc, sc and chain spaces; the only new stitch is the dc5tog cluster on round 6.