Lucky Four-Leaf Clover Granny Square — A Beginner’s Charm
A cheery four-round granny square in cream, clover green, and leaf green, finished with a lucky four-leaf clover charm. Beginner-friendly and quick.
About this pattern
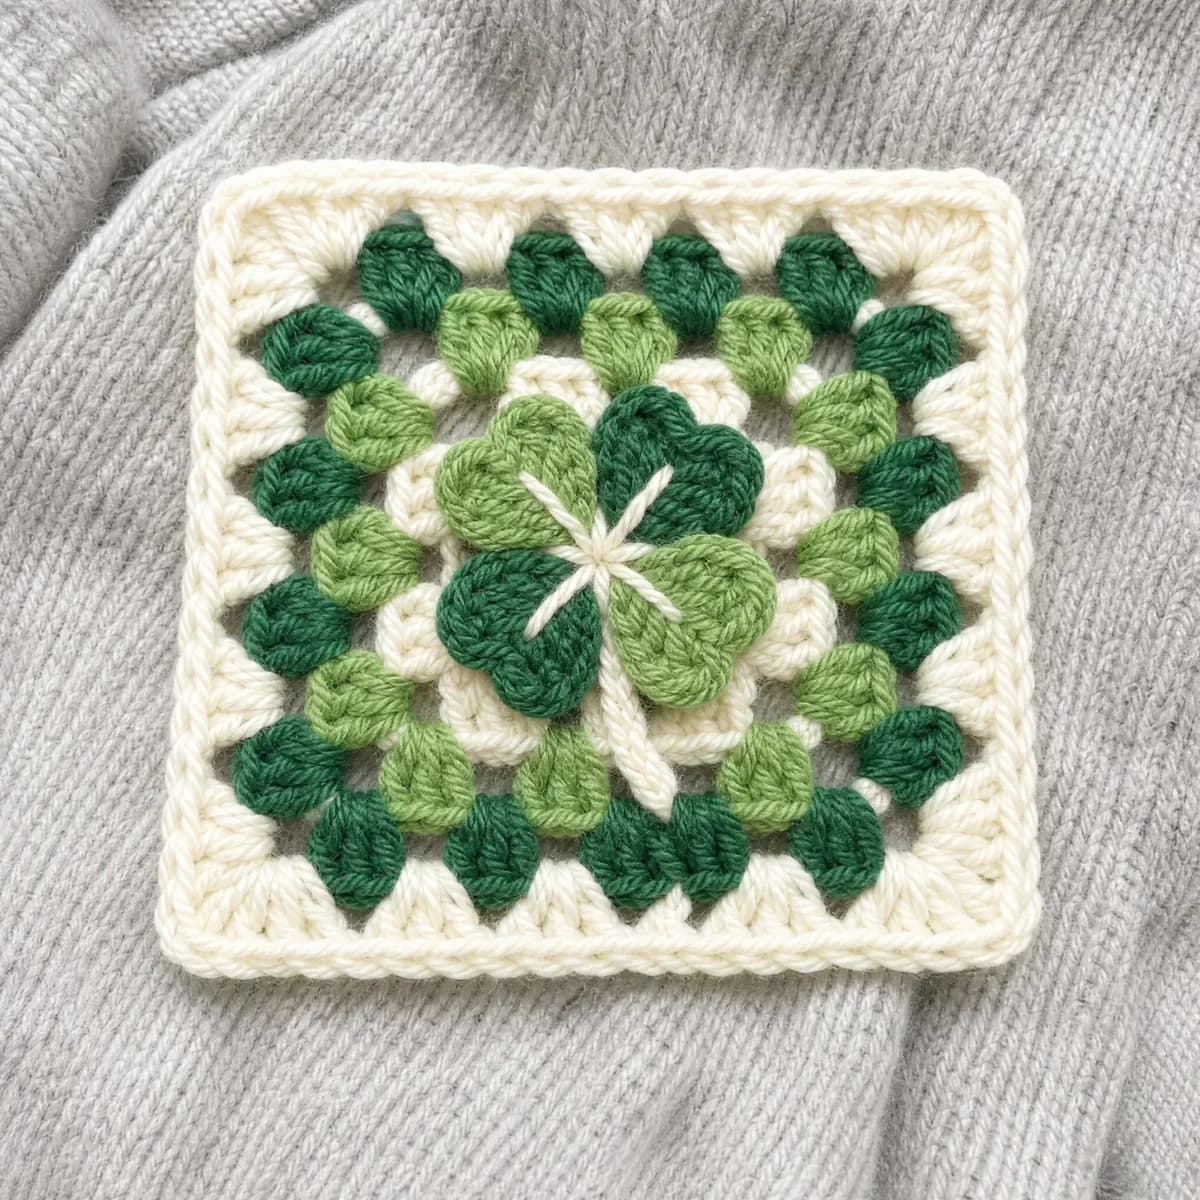
The Lucky Four-Leaf Clover Granny Square starts out as a classic cream-and-green granny, worked in four rounds and finished with a neat border - but the real charm comes from the tiny four-leaf clover appliqué stitched on top. Each little leaf, the short stem, and the cheerful center are worked separately and sewn into place, so the finished square carries its own small wish for good luck right in the middle.
This is a lovely project for building confidence with basic granny-square construction: rounds built from a magic ring, corner chain-2 spaces, and clusters of double crochet worked evenly around. Because the color changes are simple - cream for the base rounds, clover green stepping in mid-square, and leaf green for the little clover shapes - it suits beginners who want a project with just enough new skills to feel like progress.
Finished, the square measures about 6 x 6 inches, with soft cream corners framing the green rounds and that sweet stitched clover resting near the center. It is a natural fit for a lucky-themed blanket, a cluster of coasters, or a little zippered pouch - anywhere you want a small, cheerful reminder that good things are on their way.
Variations
Idea 1
This square is easy to make your own. Swap the clover greens for a deeper forest and a soft sage if you want a mossier look, or try the whole thing in autumn tones with a golden cream and rusty leaf colors for a completely different mood. Worsted weight and a 5.0 mm hook give you the sizing here, but this pattern moves beautifully to a lighter cotton yarn with a smaller hook for dressier coasters, or up to a chunky yarn and larger hook for an extra-fast throw. You could also skip the clover appliqué on a few squares in a blanket and let just a handful carry the lucky charm, scattered through the plainer rounds like clovers hiding in a lawn.
Idea 2
I designed this square on a whim, the kind of day where I wanted something small and hopeful to work on, and the four-leaf clover just felt right. What I love most is how the appliqué turns an ordinary granny square into a little keepsake - you finish the base rounds, and then you get to play, shaping tiny leaves and tucking them into place like you are arranging a real clover you found in the grass. It is forgiving, too: the stitch count stays simple throughout, so you can relax into the rhythm of it. By the time you sew on that last leaf, you will understand why I keep a stack of these in my basket to give away for good luck.
Common mistakes
Losing the corner chain-2 space
It's easy to work into the wrong stitch after a corner and shift the whole square off-center. Always count over to the ch-2 space itself before placing your next 3-dc group.
Pulling the magic ring too loose
A loose ring leaves a visible gap at the very center of round one. Snug it down firmly before working your first stitches into it.
Rushing the color change joins
Cutting yarn too close to the join can let stitches unravel as you weave in ends. Leave a longer tail and weave it through several stitches for a join that holds.
Sewing the clover appliqué crookedly
Because the leaves are worked separately, it's tempting to eyeball their placement. Pin all three leaves and the stem in place first and step back to check the balance before you stitch.
Materials & abbreviations
Materials
- Worsted-weight yarn in 3 colors (cream, clover green, leaf green) — about 25–40 g total per square
- 5.0 mm crochet hook
- Yarn needle for weaving in ends
- Scissors
Abbreviations
- ch
- chain
- dc
- double crochet
- sc
- single crochet
- sl st
- slip stitch
- sp
- space
- st(s)
- stitch(es)
- rnd
- round
- MR
- magic ring
Main pattern
The Background Square — Round 1
With cream, in a magic ring: ch 3, 2 dc, ch 2, [3 dc, ch 2] 3 times; sl st to top of ch-3 to join (12)
- Using cream yarn, in a magic ring: make 3 chain stitches, 2 double crochet, make 2 chain stitches, [3 double crochet, make 2 chain stitches] 3 times; slip stitch to top of ch-3 to join.
Tip Work the plain background square first — the lucky four-leaf clover pieces are sewn on at the end. Every count below is math-verified.
The Background Square — Round 2
sl st to corner sp, ch 3, 2 dc, ch 2, 3 dc in same corner, ch 1, [(3 dc, ch 2, 3 dc) in corner sp, ch 1, ] 3 times; sl st to join (24)
- Slip stitch to corner space, make 3 chain stitches, 2 double crochet, make 2 chain stitches, 3 double crochet in same corner, make 1 chain stitch, [(3 double crochet, make 2 chain stitches, 3 double crochet) in corner space, make 1 chain stitch, ] 3 times; slip stitch to join.
The Background Square — Round 3
With clover green, sl st to corner sp, ch 3, 2 dc, ch 2, 3 dc in same corner, ch 1, 3 dc, ch 1, [(3 dc, ch 2, 3 dc) in corner sp, ch 1, 3 dc, ch 1, ] 3 times; sl st to join (36)
- Using clover green yarn, slip stitch to corner space, make 3 chain stitches, 2 double crochet, make 2 chain stitches, 3 double crochet in same corner, make 1 chain stitch, 3 double crochet, make 1 chain stitch, [(3 double crochet, make 2 chain stitches, 3 double crochet) in corner space, make 1 chain stitch, 3 double crochet, make 1 chain stitch, ] 3 times; slip stitch to join.
The Background Square — Round 4
sl st to corner sp, ch 3, 2 dc, ch 2, 3 dc in same corner, ch 1, 3 dc, ch 1, 3 dc, ch 1, [(3 dc, ch 2, 3 dc) in corner sp, ch 1, 3 dc, ch 1, 3 dc, ch 1, ] 3 times; sl st to join (48)
The Background Square — Border
With cream, sl st into the corner ch-2 sp, ch 1, [3 sc in the corner sp, (sc in next 3 sts, sc in next sp) 3 times, sc in next 3 sts] 4 times; sl st to the first sc (72)
- Using cream yarn, slip stitch into the corner ch-2 space, make 1 chain stitch, [3 single crochet in the corner space, (single crochet in next 3 stitches, single crochet in next space) 3 times, single crochet in next 3 stitches] 4 times; slip stitch to the first single crochet.
The Background Square — Additional guidance
Slip stitch to corner space, make 3 chain stitches, 2 double crochet, make 2 chain stitches, 3 double crochet in same corner, make 1 chain stitch, 3 double crochet, make 1 chain stitch, 3 double crochet, make 1 chain stitch, [(3 double crochet, make 2 chain stitches, 3 double crochet) in corner space, make 1 chain stitch, 3 double crochet, make 1 chain stitch, 3 double crochet, make 1 chain stitch, ] 3 times; slip stitch to join.
The Leaf — Round 1
ch 10, sc in 2nd ch from hook, hdc in next ch, dc in next ch, dc in next ch, 3 tr in next ch, dc in next ch, dc in next ch, hdc in next ch, sc in next ch (11)
Tip Worked in clover green. Leave a long tail for sewing.
The Stem — Round 1
ch 5, sc in 2nd ch from hook, sc in next ch, sc in next ch, sc in next ch (4)
Tip Worked in leaf green. Leave a long tail for sewing.
The Center — Round 1
6 sc in a magic ring (6)
Tip Worked in cream. Leave a long tail for sewing.
Assembly — Bringing It Together — Step 1
Make 4 Leaf pieces in clover green, 1 Stem in leaf green, and 1 Center in cream.
Assembly — Bringing It Together — Step 2
Pin the 4 leaves onto the square in a plus-sign arrangement, tips pointing out (up, down, left, right) with their base points all meeting at one spot near the center or a corner of the square.
Assembly — Bringing It Together — Step 3
Rotate each leaf slightly so the cluster looks soft and rounded rather than a stiff cross.
Assembly — Bringing It Together — Step 4
Pin the Stem below the leaf cluster, angled slightly off to one side so it looks like the clover is growing up from below.
Assembly — Bringing It Together — Step 5
Pin the cream Center circle directly over the spot where the 4 leaf bases and the top of the stem all meet, covering the raw edges.
Assembly — Bringing It Together — Step 6
Sew every piece down with small whip stitches in a matching thread, working through both the appliqué and the background square, then weave in all ends on the wrong side.
Assembly — Bringing It Together — Embroidery
With leaf green, work one straight stitch from base to tip down the center of each leaf to suggest a vein.
Assembly — Bringing It Together — Embroidery
With cream, add one tiny straight stitch across the stem near its base to look like a little leaf-node.
Important notes
Gauge: the finished square is about 6 x 6 inches in Worsted weight yarn with a 5.0 mm hook. Tight crocheters can go up half a hook size; loose ones down half.
Color plan: the sample uses cream, clover green, leaf green in round order — change colors with a slip-stitch join in the first stitch of the new round.
Block your square lightly before sewing on the clover pieces - a flat, even base makes the appliqué sit much straighter.
Keep a small stitch marker on your working loop whenever you set the square down mid-round; it saves you from recounting stitches when you pick it back up.
Frequently asked questions
This square is worked in worsted weight yarn with a 5.0 mm hook, which keeps the stitches nice and defined. Any smooth worsted yarn in cream and two shades of green will work beautifully.
Yes, it's labeled beginner-friendly for a reason - the stitch pattern repeats predictably across four rounds and a border. The clover appliqué adds a fun extra step, but it uses the same basic stitches as the rest of the square.
Once blocked, it measures about 6 x 6 inches. That makes it easy to combine with other same-sized squares if you are planning a larger project.
Absolutely - the clover theme works with any two greens and a light background color. Just keep good contrast between the shades so the leaf shapes stay visible against the base.
Once the leaves, stem, and center are stitched, pin them in place on the finished square and sew around the edges with a yarn needle and matching thread. Weaving the tail through a few stitches on the back keeps everything secure without bulk.