Little Owl Granny Square — A Wide-Eyed Beginner Favorite
Stitch a wide-eyed Little Owl Granny Square in soft cream, warm brown, and sunny mustard — six easy rounds plus a simple sc border, perfect for beginners.
About this pattern
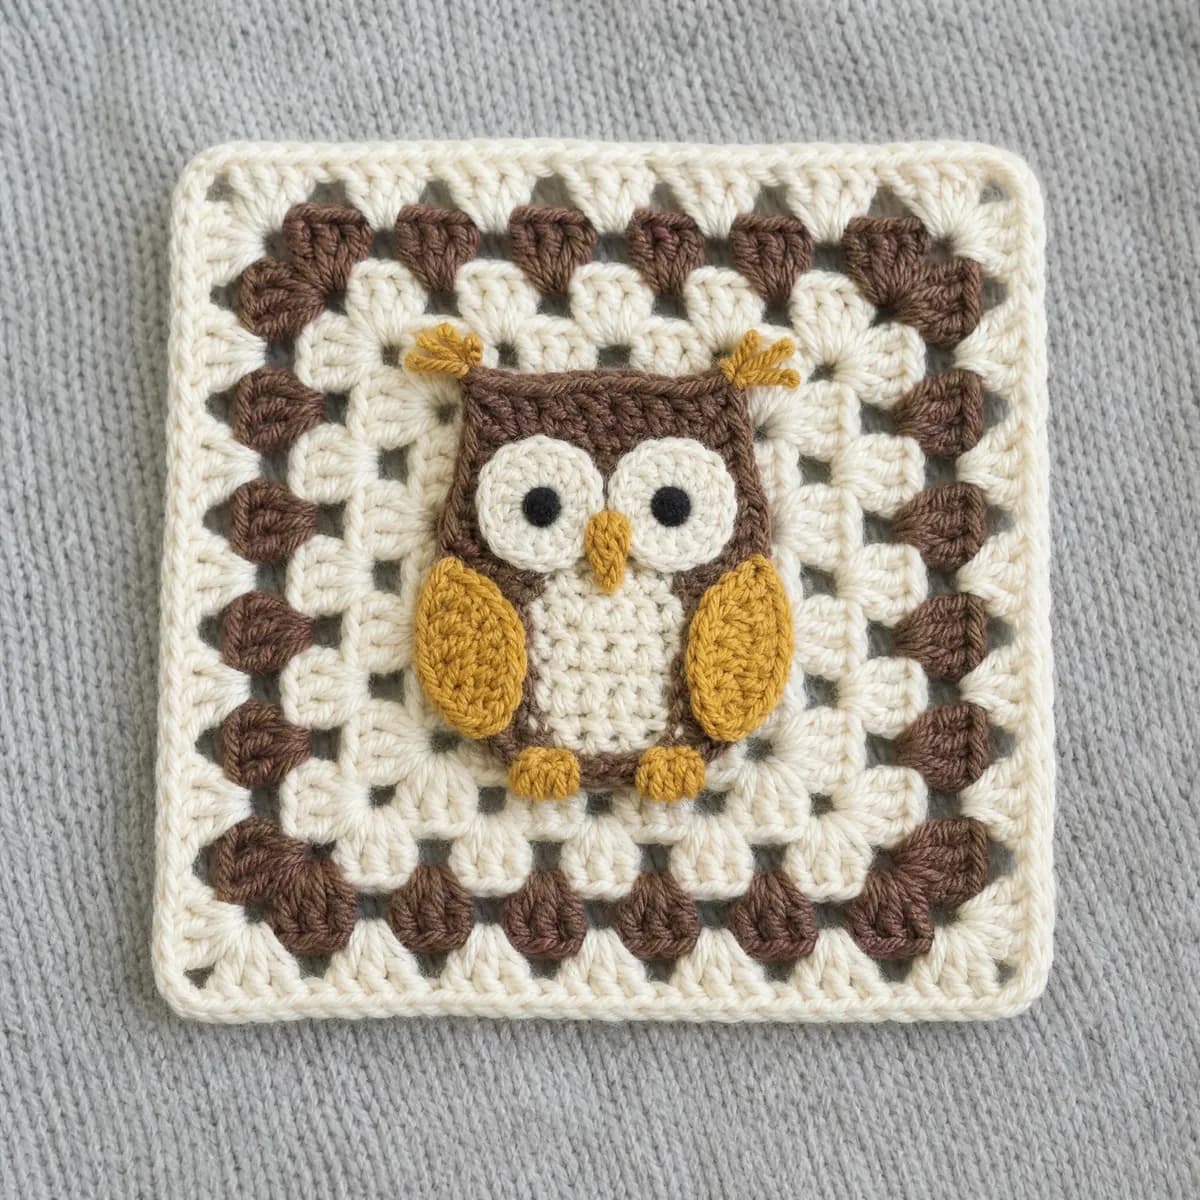
The Little Owl Granny Square takes the classic granny format everyone loves and gives it a face — literally. Underneath all that dc-and-chain structure sits a round, wide-eyed owl, stitched separately in small pieces and sewn onto the finished background. It's the kind of square that gets a smile out of whoever's watching you work, and it turns a simple stack of blocks into a story.
The background square itself is pure classic technique: you start in a magic ring, build out corner ch-2 spaces round by round, and finish with a tidy single crochet border. The owl is where the fun happens — a rounded body, two eyes, a little beak, and a pair of wing tips, each worked up small and whip-stitched into place. If you're comfortable with basic double crochet and a simple seam, you're ready for this one.
Finished, the square measures about 7 x 7 inches with that big-eyed owl perched right in the center of a cream, warm brown, and mustard background. Make one as a stand-alone coaster or wall square, or stitch up a whole flock and join them into a blanket, pillow front, or basket that's just a little more curious than the rest of your granny square collection.
Variations
Idea 1
This owl takes color changes beautifully, so don't feel locked into cream, warm brown, and mustard. Try a soft gray body with black and white eyes for a snowy owl, or swap in rust and gold for an autumn woods feel. A worsted weight cotton blend will give the square a bit more structure if you're planning a bag or pillow front instead of a blanket. If you want a bigger block, add an extra plain dc round in your background color before the border, and the owl will simply sit in a wider frame. If you're stitching a whole set, try giving each owl a different eye color, since a little variation like that makes a flock of squares feel collected rather than mass produced.
Idea 2
I designed this one because I wanted a granny square with a little personality, not just another color-block circle-in-a-square. There's something about that round owl face, the big eyes, the tiny beak, that makes people stop and ask who made it. I love that the background square teaches all the classic granny skills, corners and all, while the owl pieces give you a small, satisfying appliqué project to practice your seaming on. It's forgiving, too: your eyes don't have to be perfectly symmetrical for the owl to look charming, which takes the pressure off. By the time you sew that last wing tip in place, you'll have a square that feels like it has its own little character.
Common mistakes
Losing track of corners
It's easy to drift a stitch or two off center once you're past round three. Count your ch-2 corner spaces after every round before you move on, and it'll stay square.
Sewing the eyes off-center
Owl eyes are unforgiving if they land crooked. Lay both pieces on the body and pin them in place first, then step back and check before you stitch a single seam.
Pulling appliqué seams too tight
Whip-stitching the pieces on with tight, tugging tension will cup the background square. Keep your tension relaxed and let the pieces sit flat as you sew.
Skipping a gauge swatch
Worsted yarn varies more than you'd think, and a too-tight or too-loose square will throw off the owl's proportions. A quick swatch keeps everything sized to match.
Materials & abbreviations
Materials
- Worsted-weight yarn in 3 colors (cream, warm brown, mustard) — about 25–40 g total per square
- 5.0 mm crochet hook
- Yarn needle for weaving in ends
- Scissors
Abbreviations
- ch
- chain
- dc
- double crochet
- sc
- single crochet
- sl st
- slip stitch
- sp
- space
- st(s)
- stitch(es)
- rnd
- round
- MR
- magic ring
Main pattern
The Background Square — Round 1
With cream, in a magic ring: ch 3, 2 dc, ch 2, [3 dc, ch 2] 3 times; sl st to top of ch-3 to join (12)
- Using cream yarn, in a magic ring: make 3 chain stitches, 2 double crochet, make 2 chain stitches, [3 double crochet, make 2 chain stitches] 3 times; slip stitch to top of ch-3 to join.
Tip Work the plain background square first — the little owl pieces are sewn on at the end. Every count below is math-verified.
The Background Square — Round 2
sl st to corner sp, ch 3, 2 dc, ch 2, 3 dc in same corner, ch 1, [(3 dc, ch 2, 3 dc) in corner sp, ch 1, ] 3 times; sl st to join (24)
- Slip stitch to corner space, make 3 chain stitches, 2 double crochet, make 2 chain stitches, 3 double crochet in same corner, make 1 chain stitch, [(3 double crochet, make 2 chain stitches, 3 double crochet) in corner space, make 1 chain stitch, ] 3 times; slip stitch to join.
The Background Square — Round 3
With warm brown, sl st to corner sp, ch 3, 2 dc, ch 2, 3 dc in same corner, ch 1, 3 dc, ch 1, [(3 dc, ch 2, 3 dc) in corner sp, ch 1, 3 dc, ch 1, ] 3 times; sl st to join (36)
- Using warm brown yarn, slip stitch to corner space, make 3 chain stitches, 2 double crochet, make 2 chain stitches, 3 double crochet in same corner, make 1 chain stitch, 3 double crochet, make 1 chain stitch, [(3 double crochet, make 2 chain stitches, 3 double crochet) in corner space, make 1 chain stitch, 3 double crochet, make 1 chain stitch, ] 3 times; slip stitch to join.
The Background Square — Round 4
sl st to corner sp, ch 3, 2 dc, ch 2, 3 dc in same corner, ch 1, 3 dc, ch 1, 3 dc, ch 1, [(3 dc, ch 2, 3 dc) in corner sp, ch 1, 3 dc, ch 1, 3 dc, ch 1, ] 3 times; sl st to join (48)
The Background Square — Round 5
With cream, sl st to corner sp, ch 3, 2 dc, ch 2, 3 dc in same corner, ch 1, 3 dc, ch 1, 3 dc, ch 1, 3 dc, ch 1, [(3 dc, ch 2, 3 dc) in corner sp, ch 1, 3 dc, ch 1, 3 dc, ch 1, 3 dc, ch 1, ] 3 times; sl st to join (60)
The Background Square — Border
sl st into the corner ch-2 sp, ch 1, [3 sc in the corner sp, (sc in next 3 sts, sc in next sp) 4 times, sc in next 3 sts] 4 times; sl st to the first sc (88)
- Slip stitch into the corner ch-2 space, make 1 chain stitch, [3 single crochet in the corner space, (single crochet in next 3 stitches, single crochet in next space) 4 times, single crochet in next 3 stitches] 4 times; slip stitch to the first single crochet.
The Background Square — Additional guidance
Slip stitch to corner space, make 3 chain stitches, 2 double crochet, make 2 chain stitches, 3 double crochet in same corner, make 1 chain stitch, 3 double crochet, make 1 chain stitch, 3 double crochet, make 1 chain stitch, [(3 double crochet, make 2 chain stitches, 3 double crochet) in corner space, make 1 chain stitch, 3 double crochet, make 1 chain stitch, 3 double crochet, make 1 chain stitch, ] 3 times; slip stitch to join.
The Background Square — Additional guidance
Using cream yarn, slip stitch to corner space, make 3 chain stitches, 2 double crochet, make 2 chain stitches, 3 double crochet in same corner, make 1 chain stitch, 3 double crochet, make 1 chain stitch, 3 double crochet, make 1 chain stitch, 3 double crochet, make 1 chain stitch, [(3 double crochet, make 2 chain stitches, 3 double crochet) in corner space, make 1 chain stitch, 3 double crochet, make 1 chain stitch, 3 double crochet, make 1 chain stitch, 3 double crochet, make 1 chain stitch, ] 3 times; slip stitch to join.
The Body — Round 1
6 sc in a magic ring (6)
Tip Worked in warm brown. Leave a long tail for sewing.
The Body — Round 2
[inc] repeat 6 times (12)
The Body — Round 3
[sc, inc] repeat 6 times (18)
The Eye (make 2) — Round 1
6 sc in a magic ring (6)
Tip Worked in cream. Leave a long tail for sewing.
The Eye (make 2) — Round 2
[inc] repeat 6 times (12)
The Beak — Round 1
ch 4, sc in 2nd ch from hook, [sc in next ch] repeat 2 times (3)
Tip Worked in mustard. Leave a long tail for sewing.
The Beak — Round 2
ch 1, turn, dec, sc (2)
The Beak — Round 3
ch 1, turn, dec (1)
The Wing tip (make 2) — Round 1
6 sc in a magic ring (6)
Tip Worked in warm brown. Leave a long tail for sewing.
Assembly — Bringing It Together — Step 1
Pin the warm brown Body circle just below center on the background square, leaving room above for the face.
Assembly — Bringing It Together — Step 2
Pin the two cream Eyes side by side along the top edge of the Body, slightly overlapping it, with a small gap between them.
Assembly — Bringing It Together — Step 3
Pin the mustard Beak point-down in the gap between the two Eyes, tucked just under their bottom edges.
Assembly — Bringing It Together — Step 4
Pin a Wing tip on each lower side of the Body, angled slightly outward, if using.
Assembly — Bringing It Together — Step 5
Whipstitch or mattress-stitch every piece in place through both loops, working the Eyes and Beak first, then the Body edge, then the Wing tips.
Assembly — Bringing It Together — Step 6
Weave in all ends on the wrong side of the work.
Assembly — Bringing It Together — Embroidery
Work a small brown French knot or satin-stitch dot in the center of each cream Eye for the pupil.
Assembly — Bringing It Together — Embroidery
Add two short mustard straight stitches angled outward just above the Eyes to suggest tiny ear tufts.
Assembly — Bringing It Together — Embroidery
Scatter a few short mustard straight stitches across the lower Body for a feathery texture, if desired.
Important notes
Gauge: the finished square is about 7 x 7 inches in Worsted weight yarn with a 5.0 mm hook. Tight crocheters can go up half a hook size; loose ones down half.
Color plan: the sample uses cream, warm brown, mustard in round order — change colors with a slip-stitch join in the first stitch of the new round.
Weave in the background square's color-change ends as you go rather than saving them all for the end — the owl appliqué already gives you enough tails to manage.
Pin the owl pieces in place with removable stitch markers before you sew, so you can step back and adjust the expression before it's permanent.
Frequently asked questions
Yes — the background square uses the same skills as any classic granny square, and the owl pieces are small and simple enough to be a gentle introduction to appliqué. If you can double crochet and sew a seam, you can make this owl.
It's written for worsted weight yarn with a 5.0 mm hook, which keeps the stitches easy to see and count. Any worsted-weight yarn in your three colors will work well.
Pin the body, eyes, beak, and wing tips in place first so you're happy with the layout, then whip-stitch each piece down with a length of matching or contrasting yarn threaded onto a yarn needle.
Absolutely — the appliqué pieces are separate from the granny rounds, so you can pick any colors you like for the owl's body, eyes, beak, and wings, whether you want it to match or stand out.
It finishes at about 7 x 7 inches, the standard size for joining into blankets, pillow covers, or bags. A handful of them together also make a fun wall hanging.