Little Carrot Granny Square Pattern — A Cheerful Beginner Design
Stitch the Little Carrot Granny Square in five easy rounds of cream, carrot orange, and leaf green — finished with a playful carrot appliqué on top.
About this pattern
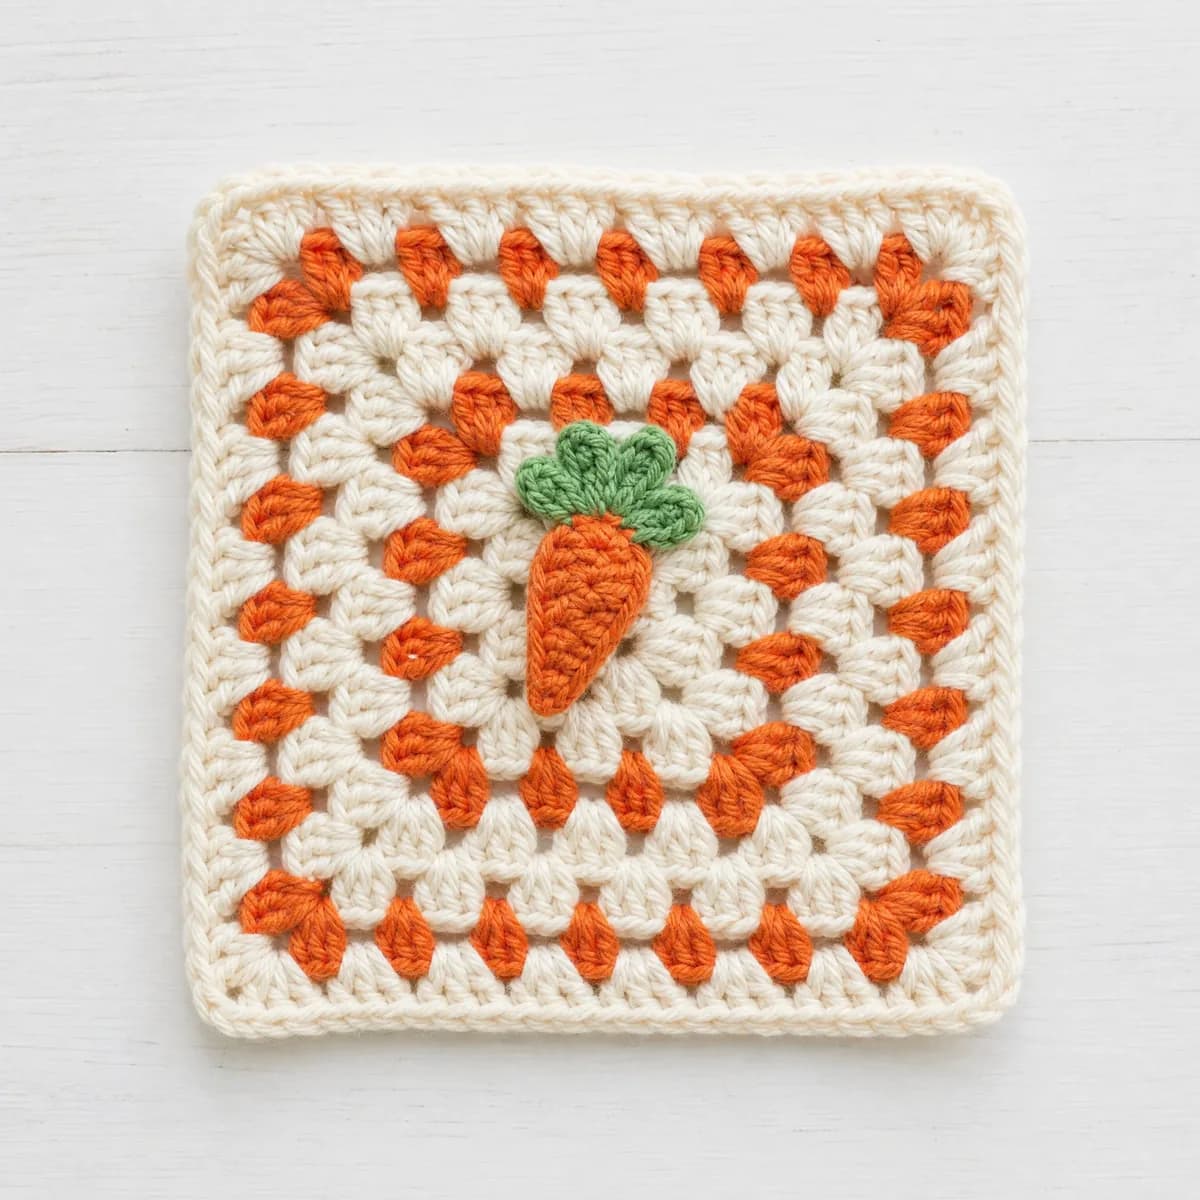
The Little Carrot Granny Square is a classic granny square with a playful twist: a tiny carrot appliqué, complete with three fanned-out leaves, sewn onto a traditional cream, carrot orange, and leaf green base. It keeps the familiar corner-based construction crocheters already know, but the finished piece has an unmistakable garden charm that sets it apart from a plain solid-color square. At about 6 x 6 inches, it works equally well as a stand-alone motif or as one bright piece in a bigger collection.
This design uses only the essentials of granny square construction: a magic ring start, chain-3 corners, and double crochet groups built up over five rounds, plus a simple border to finish the edge. The Little Carrot appliqué pieces are worked separately in the same stitches before being sewn on, so there is nothing new to learn beyond a needle and thread at the end. That makes it a comfortable pick for a beginner who has finished one or two granny squares already and wants a project with a bit more personality.
Once it's blocked and the carrot is stitched into place, this square has a tidy, dimensional look that reads instantly as a little vegetable patch rather than an abstract shape. Its finished size makes it a natural fit for a patchwork blanket, a set of coasters, or a cheerful mug rug, and it looks just as good gathered into a small produce-themed grouping with a few plain squares mixed in.
Variations
Idea 1
If you want to make the Little Carrot your own, start with color. Swap the carrot orange for a soft coral or golden yellow if you would rather grow a different vegetable, or try two shades of green for the leaves so they read as more textured. You can also size the whole square up by working an extra round or two in a fourth color before the border, which gives you more room to play with the palette. For a softer, huggable finish, try a lightweight cotton-blend yarn instead of standard worsted, or size down to a lighter fingering weight for a set of tiny carrots strung together instead of a single square. Either way, the construction stays the same.
Idea 2
I love working up the Little Carrot Granny Square because it feels like a tiny garden harvest sitting right in my hands. There is something so satisfying about watching a plain cream base turn into a bright carrot orange body, then fanning those leaf green tips out at the very end like they were just pulled from the dirt. It is simple enough that I can stitch it while chatting with a friend, but the little appliqué gives it just enough personality that it never feels boring. Every time I finish one, I set it on the table and smile at it before I even think about sewing it onto anything else. It is the kind of square that makes me want to make five more just to line them up.
Common mistakes
Rushing the magic ring pull
Give the loop a firm tug before you start round one, or your center will stay loose and gappy.
Miscounting the corner stitches
Each corner needs a full 3-dc, ch-2, 3-dc group — miscounting here throws off every round after it.
Skipping stitch markers on corners
Drop a marker in each corner ch-2 space as you go so you always know exactly where to turn next.
Attaching the carrot before blocking
Block the background square first so it lies flat, then sew the appliqué on for a tidier finish.
Materials & abbreviations
Materials
- Worsted-weight yarn in 3 colors (cream, carrot orange, leaf green) — about 25–40 g total per square
- 5.0 mm crochet hook
- Yarn needle for weaving in ends
- Scissors
Abbreviations
- ch
- chain
- dc
- double crochet
- sc
- single crochet
- sl st
- slip stitch
- sp
- space
- st(s)
- stitch(es)
- rnd
- round
- MR
- magic ring
Main pattern
The Background Square — Round 1
With cream, in a magic ring: ch 3, 2 dc, ch 2, [3 dc, ch 2] 3 times; sl st to top of ch-3 to join (12)
- Using cream yarn, in a magic ring: make 3 chain stitches, 2 double crochet, make 2 chain stitches, [3 double crochet, make 2 chain stitches] 3 times; slip stitch to top of ch-3 to join.
Tip Work the plain background square first — the little carrot pieces are sewn on at the end. Every count below is math-verified.
The Background Square — Round 2
sl st to corner sp, ch 3, 2 dc, ch 2, 3 dc in same corner, ch 1, [(3 dc, ch 2, 3 dc) in corner sp, ch 1, ] 3 times; sl st to join (24)
- Slip stitch to corner space, make 3 chain stitches, 2 double crochet, make 2 chain stitches, 3 double crochet in same corner, make 1 chain stitch, [(3 double crochet, make 2 chain stitches, 3 double crochet) in corner space, make 1 chain stitch, ] 3 times; slip stitch to join.
The Background Square — Round 3
With carrot orange, sl st to corner sp, ch 3, 2 dc, ch 2, 3 dc in same corner, ch 1, 3 dc, ch 1, [(3 dc, ch 2, 3 dc) in corner sp, ch 1, 3 dc, ch 1, ] 3 times; sl st to join (36)
- Using carrot orange yarn, slip stitch to corner space, make 3 chain stitches, 2 double crochet, make 2 chain stitches, 3 double crochet in same corner, make 1 chain stitch, 3 double crochet, make 1 chain stitch, [(3 double crochet, make 2 chain stitches, 3 double crochet) in corner space, make 1 chain stitch, 3 double crochet, make 1 chain stitch, ] 3 times; slip stitch to join.
The Background Square — Round 4
sl st to corner sp, ch 3, 2 dc, ch 2, 3 dc in same corner, ch 1, 3 dc, ch 1, 3 dc, ch 1, [(3 dc, ch 2, 3 dc) in corner sp, ch 1, 3 dc, ch 1, 3 dc, ch 1, ] 3 times; sl st to join (48)
The Background Square — Border
With cream, sl st into the corner ch-2 sp, ch 1, [3 sc in the corner sp, (sc in next 3 sts, sc in next sp) 3 times, sc in next 3 sts] 4 times; sl st to the first sc (72)
- Using cream yarn, slip stitch into the corner ch-2 space, make 1 chain stitch, [3 single crochet in the corner space, (single crochet in next 3 stitches, single crochet in next space) 3 times, single crochet in next 3 stitches] 4 times; slip stitch to the first single crochet.
The Background Square — Additional guidance
Slip stitch to corner space, make 3 chain stitches, 2 double crochet, make 2 chain stitches, 3 double crochet in same corner, make 1 chain stitch, 3 double crochet, make 1 chain stitch, 3 double crochet, make 1 chain stitch, [(3 double crochet, make 2 chain stitches, 3 double crochet) in corner space, make 1 chain stitch, 3 double crochet, make 1 chain stitch, 3 double crochet, make 1 chain stitch, ] 3 times; slip stitch to join.
The Carrot — Round 1
ch 11, 1 sc in 2nd ch from hook, 8 sc in next 8 chs, 3 sc in last ch, working back along the underside, 8 sc in next 8 chs, 2 sc in last ch (22)
Tip Worked in carrot orange. Leave a long tail for sewing.
The Leaf 1 — Round 1
ch 8, 1 sc in 2nd ch from hook, 5 sc in next 5 chs, 3 sc in last ch, working back along the underside, 5 sc in next 5 chs, 2 sc in last ch (16)
Tip Worked in leaf green. Leave a long tail for sewing.
The Leaf 2 — Round 1
ch 6, 1 sc in 2nd ch from hook, 3 sc in next 3 chs, 3 sc in last ch, working back along the underside, 3 sc in next 3 chs, 2 sc in last ch (12)
Tip Worked in leaf green. Leave a long tail for sewing.
The Leaf 3 — Round 1
ch 7, 1 sc in 2nd ch from hook, 4 sc in next 4 chs, 3 sc in last ch, working back along the underside, 4 sc in next 4 chs, 2 sc in last ch (14)
Tip Worked in leaf green. Leave a long tail for sewing.
Assembly — Bringing It Together — Step 1
Pin the Carrot piece point-down near the bottom-center of the background square, angled very slightly, so its narrow tip sits about 1 inch from the lower edge and its wide top edge sits roughly in the middle of the square.
Assembly — Bringing It Together — Step 2
Whip-stitch around the Carrot's outer edge with orange thread, keeping it flat against the background (no stuffing needed).
Assembly — Bringing It Together — Step 3
Pin Leaf 1 centered directly above the carrot's wide top edge, tip pointing straight up, overlapping the carrot's top edge by about 1/4 inch.
Assembly — Bringing It Together — Step 4
Pin Leaf 2 and Leaf 3 to either side of Leaf 1, angled outward like a fan, each overlapping the carrot's top edge and the base of Leaf 1 slightly.
Assembly — Bringing It Together — Step 5
Whip-stitch each leaf's edge to the background with green thread, tacking the overlapping bases firmly so the carrot and greens read as one motif.
Assembly — Bringing It Together — Step 6
Weave in all yarn ends on the wrong side of the background square.
Assembly — Bringing It Together — Embroidery
With cream, add 3 short diagonal straight stitches across the width of the carrot body to suggest texture ridges.
Assembly — Bringing It Together — Embroidery
With cream, add one small straight stitch at the base of the leaves to tack the greens together where they meet the carrot.
Important notes
Gauge: the finished square is about 6 x 6 inches in Worsted weight yarn with a 5.0 mm hook. Tight crocheters can go up half a hook size; loose ones down half.
Color plan: the sample uses cream, carrot orange, leaf green in round order — change colors with a slip-stitch join in the first stitch of the new round.
Keep your tension even across all three colors so the square lies flat once you join your rounds and add the border.
Frequently asked questions
Worsted weight yarn with a 5.0 mm hook gives the cleanest stitch definition for this pattern. It also keeps the finished square close to the 6 x 6 inch size.
Yes, the five rounds use standard double crochet and chain spaces, so it is a great beginner project. Just take your time with the corner ch-2 spaces since those shape the whole square.
Once both pieces are finished and blocked, sew the carrot and its leaves onto the cream background with a yarn needle and matching thread. A few small stitches around the edges will hold it securely.
Absolutely, swap the carrot orange and leaf green for any two colors you like while keeping cream as the base. The construction stays exactly the same no matter which colors you choose.
That depends on the size you want, but a lap blanket usually takes somewhere between 60 and 80 squares of this size. Joining them in a grid keeps all the little carrots facing the same direction for a fun repeated motif.