Layered Lotus Granny Square — A Blooming Beginner Favorite
Stitch the Layered Lotus Granny Square in six easy rounds of cream, sage, and blush pink — a beginner-friendly bloom worked from a soft center outward.
About this pattern
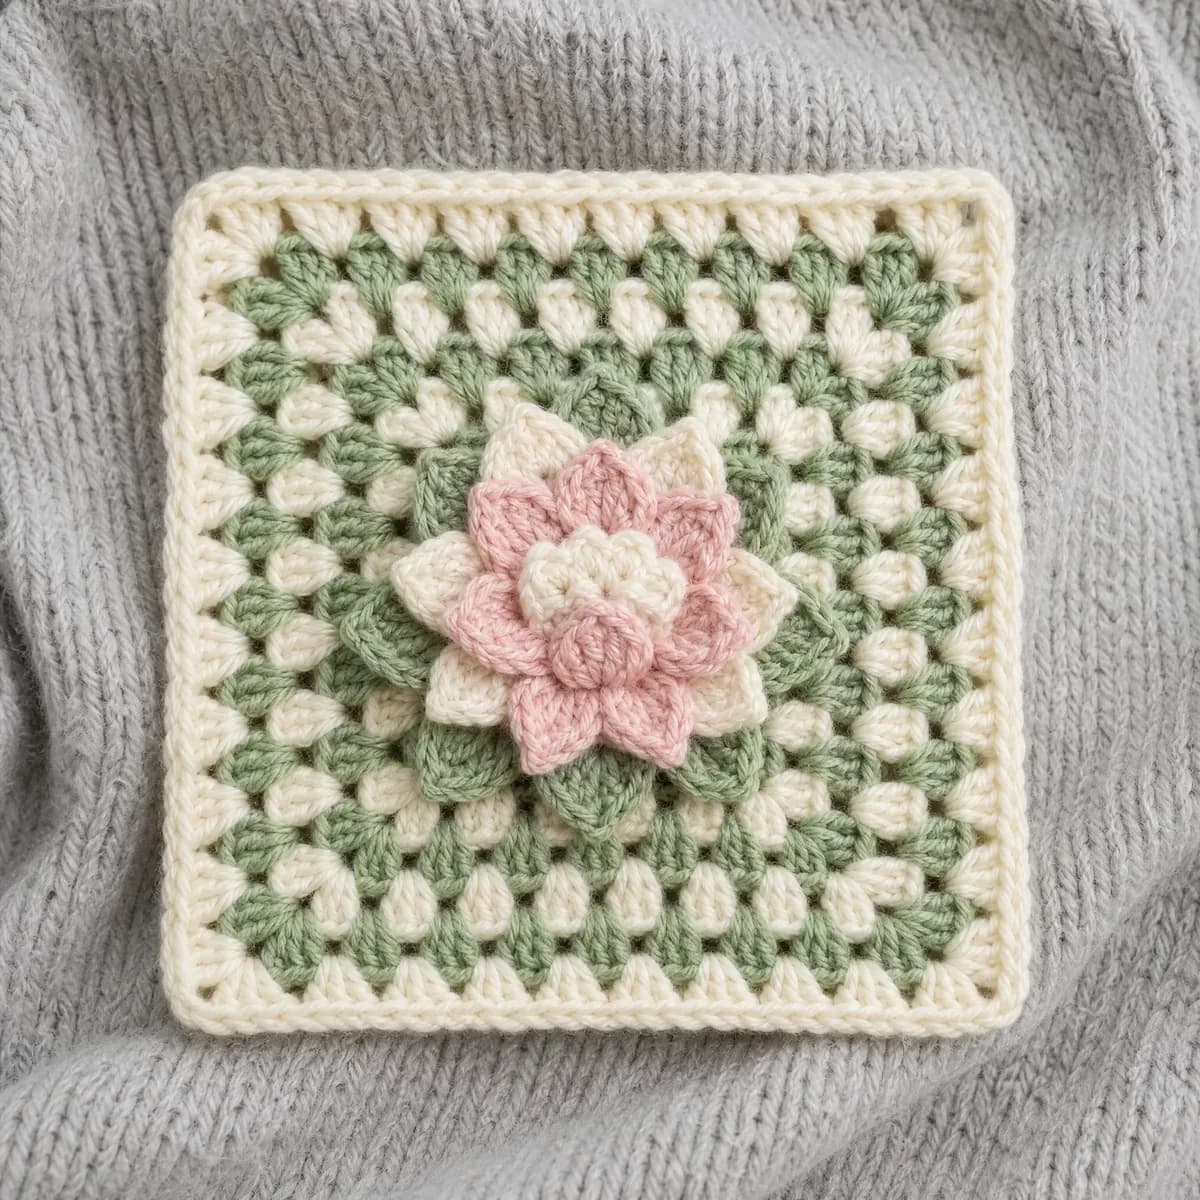
The Layered Lotus Granny Square is my take on a bloom caught mid-open, built the way a lotus actually grows — a soft cream heart at the center, ringed by a band of quiet sage, and finished with a border that unfurls in blush pink. I designed it so the color changes do the storytelling: you don't need embroidery or extra shaping to see the flower, just the rounds themselves opening outward like petals.
Every round is worked in basic double crochet with simple chain-2 corners, so if you can make a magic ring and count to three, you're ready. There's no popcorn stitch, no cluster, no fiddly increase to memorize — just the same rhythm of stitches and corners repeating and growing, with clean color changes to keep your hands and eyes engaged. It's a lovely first granny square for someone who wants a project that still looks intentional.
Blocked, it settles to about seven by seven inches, small enough to finish in an evening and generous enough to read clearly as its own motif. I love it as a mug rug or a small trivet on its own, and it holds up just as well multiplied into a throw, where all those little lotus hearts line up in tidy rows.
Variations
Idea 1
This pattern is so easy to make your own. Swap the palette entirely — a deep terracotta center with dusty rose petals reads just as floral, and a cream-and-navy version leans more classic than botanical. If you want the lotus to glow rather than whisper, try a saturated coral or magenta for that final border round instead of blush pink, and keep the center rounds pale so the contrast stays crisp. Sizing up is simple too: work the same corner increases for a few extra rounds in a fourth color before you border it, and you'll have a full lotus-inspired square ready for a larger blanket. A finer cotton with a smaller hook turns this into a delicate coaster, while a chunky yarn and bigger hook make one square nearly big enough for a small pillow front.
Idea 2
I keep coming back to this square because the color changes feel like they're doing all the hard work for me. I start with cream and it's just a plain little flower bud, nothing special yet — then sage rolls in and suddenly there's a ring around it, and by the time blush pink hits the border, the whole thing has opened up into something that genuinely looks like a lotus caught mid-bloom. There's something so satisfying about a beginner square that doesn't ask much of your hands but still rewards your eyes every single round.
Common mistakes
Losing track of color changes
Because each round has its own color story, it's easy to grab the wrong skein mid-round. Pause at the join of every round and check the color before you chain up, not after.
Missing the corner ch-2 space
If you crochet into the wrong spot at a corner, the square stops growing evenly and the edges start to wave. Slow down at each corner and make sure your 3 dc land inside the ch-2 space itself.
Pulling color changes too tight
A too-tight join between colors can pucker that round and throw off your corner count. Join the new color with a relaxed slip stitch and let the tension match the rest of the round.
Weaving in ends before blocking
Weaving in every tail before you've blocked the square can lock in curl that's hard to press out later. Block the square flat first, then trim and secure ends once it's holding its shape.
Materials & abbreviations
Materials
- Worsted-weight yarn in 3 colors (cream, sage, blush pink) — about 25–40 g total per square
- 5.0 mm crochet hook
- Yarn needle for weaving in ends
- Scissors
Abbreviations
- ch
- chain
- dc
- double crochet
- sc
- single crochet
- sl st
- slip stitch
- sp
- space
- st(s)
- stitch(es)
- rnd
- round
- MR
- magic ring
Main pattern
The Background Square — Round 1
With cream, in a magic ring: ch 3, 2 dc, ch 2, [3 dc, ch 2] 3 times; sl st to top of ch-3 to join (12)
- Using cream yarn, in a magic ring: make 3 chain stitches, 2 double crochet, make 2 chain stitches, [3 double crochet, make 2 chain stitches] 3 times; slip stitch to top of ch-3 to join.
Tip Work the plain background square first — the layered lotus pieces are sewn on at the end. Every count below is math-verified.
The Background Square — Round 2
sl st to corner sp, ch 3, 2 dc, ch 2, 3 dc in same corner, ch 1, [(3 dc, ch 2, 3 dc) in corner sp, ch 1, ] 3 times; sl st to join (24)
- Slip stitch to corner space, make 3 chain stitches, 2 double crochet, make 2 chain stitches, 3 double crochet in same corner, make 1 chain stitch, [(3 double crochet, make 2 chain stitches, 3 double crochet) in corner space, make 1 chain stitch, ] 3 times; slip stitch to join.
The Background Square — Round 3
With sage, sl st to corner sp, ch 3, 2 dc, ch 2, 3 dc in same corner, ch 1, 3 dc, ch 1, [(3 dc, ch 2, 3 dc) in corner sp, ch 1, 3 dc, ch 1, ] 3 times; sl st to join (36)
- Using sage yarn, slip stitch to corner space, make 3 chain stitches, 2 double crochet, make 2 chain stitches, 3 double crochet in same corner, make 1 chain stitch, 3 double crochet, make 1 chain stitch, [(3 double crochet, make 2 chain stitches, 3 double crochet) in corner space, make 1 chain stitch, 3 double crochet, make 1 chain stitch, ] 3 times; slip stitch to join.
The Background Square — Round 4
sl st to corner sp, ch 3, 2 dc, ch 2, 3 dc in same corner, ch 1, 3 dc, ch 1, 3 dc, ch 1, [(3 dc, ch 2, 3 dc) in corner sp, ch 1, 3 dc, ch 1, 3 dc, ch 1, ] 3 times; sl st to join (48)
The Background Square — Round 5
With cream, sl st to corner sp, ch 3, 2 dc, ch 2, 3 dc in same corner, ch 1, 3 dc, ch 1, 3 dc, ch 1, 3 dc, ch 1, [(3 dc, ch 2, 3 dc) in corner sp, ch 1, 3 dc, ch 1, 3 dc, ch 1, 3 dc, ch 1, ] 3 times; sl st to join (60)
The Background Square — Border
sl st into the corner ch-2 sp, ch 1, [3 sc in the corner sp, (sc in next 3 sts, sc in next sp) 4 times, sc in next 3 sts] 4 times; sl st to the first sc (88)
- Slip stitch into the corner ch-2 space, make 1 chain stitch, [3 single crochet in the corner space, (single crochet in next 3 stitches, single crochet in next space) 4 times, single crochet in next 3 stitches] 4 times; slip stitch to the first single crochet.
The Background Square — Additional guidance
Slip stitch to corner space, make 3 chain stitches, 2 double crochet, make 2 chain stitches, 3 double crochet in same corner, make 1 chain stitch, 3 double crochet, make 1 chain stitch, 3 double crochet, make 1 chain stitch, [(3 double crochet, make 2 chain stitches, 3 double crochet) in corner space, make 1 chain stitch, 3 double crochet, make 1 chain stitch, 3 double crochet, make 1 chain stitch, ] 3 times; slip stitch to join.
The Background Square — Additional guidance
Using cream yarn, slip stitch to corner space, make 3 chain stitches, 2 double crochet, make 2 chain stitches, 3 double crochet in same corner, make 1 chain stitch, 3 double crochet, make 1 chain stitch, 3 double crochet, make 1 chain stitch, 3 double crochet, make 1 chain stitch, [(3 double crochet, make 2 chain stitches, 3 double crochet) in corner space, make 1 chain stitch, 3 double crochet, make 1 chain stitch, 3 double crochet, make 1 chain stitch, 3 double crochet, make 1 chain stitch, ] 3 times; slip stitch to join.
The Outer Petal — Round 1
ch 6, sl st in 2nd ch from hook, sc in next ch, hdc in next ch, dc in next ch, dc in next ch, then working down opposite side of chain: dc in next ch, dc in next ch, hdc in next ch, sc in next ch, sl st in next ch (8)
Tip Worked in blush pink. Leave a long tail for sewing.
The Inner Petal — Round 1
ch 5, sl st in 2nd ch from hook, sc in next ch, hdc in next ch, hdc in next ch, then working down opposite side of chain: hdc in next ch, hdc in next ch, sc in next ch, sl st in next ch (6)
Tip Worked in cream. Leave a long tail for sewing.
The Sepal — Round 1
ch 4, sl st in 2nd ch from hook, sc in next ch, hdc in next ch, then working down opposite side of chain: hdc in next ch, sc in next ch, sl st in next ch (4)
Tip Worked in sage. Leave a long tail for sewing.
Assembly — Bringing It Together — Step 1
Make 5 Outer Petals (blush pink). Arrange them in a fan with tips pointing outward and bases overlapping slightly at a single center point; pin to the background square where the flower should sit.
Assembly — Bringing It Together — Step 2
Whipstitch the Outer Petal bases together at the center, then tack only the base of each petal to the background, leaving the pointed tips unstitched so they lift slightly off the square for dimension.
Assembly — Bringing It Together — Step 3
Make 3 Inner Petals (cream). Center them on top of the Outer Petal fan, offset so each cream tip peeks between two blush pink petals; pin and sew down at the center point only.
Assembly — Bringing It Together — Step 4
Make 2 Sepals (sage). Tuck them beneath the flower's base pointing downward like a calyx, tacking just the base of each so the tips stay slightly raised.
Assembly — Bringing It Together — Step 5
Weave in all ends on the wrong side of the background square.
Assembly — Bringing It Together — Embroidery
With sage, add 3-4 short straight stitches fanning out from the center point over the base of the Inner Petals to suggest stamens.
Assembly — Bringing It Together — Embroidery
With cream, add one short straight stitch down the center of each Outer Petal as a vein line.
Important notes
Gauge: the finished square is about 7 x 7 inches in Worsted weight yarn with a 5.0 mm hook. Tight crocheters can go up half a hook size; loose ones down half.
Color plan: the sample uses cream, sage, blush pink in round order — change colors with a slip-stitch join in the first stitch of the new round.
Keep a small paperclip or scrap of yarn as a stitch marker in the last stitch of each round — with three color changes, it's an easy way to double check your count before moving on.
Press a few finished squares before you commit to a full blanket's worth of colors; blush pink can read very differently against different backgrounds once it's blocked and dry.
Frequently asked questions
Yes — every round uses basic double crochet and simple chain-2 corners, with no advanced stitches to learn. The color changes add visual interest without adding difficulty.
A worsted weight yarn in small amounts of cream, sage, and blush pink is enough for one square, since each color round uses only a short length. Leftover skeins from other projects work well here.
The pattern is written for a 5.0 mm hook, but you can size up or down slightly to adjust the finished measurement. Just keep your tension even across all three colors so the corners stay square.
One blocked square makes a sweet mug rug or a small trivet on its own. It's also a nice way to test a color palette before committing to a full blanket.
Once each square is blocked to the same size, you can whip stitch or single crochet them together through the outer loops of the border round. Keeping the border color consistent across squares helps the seams disappear.