Five-Point Star Granny Square – Free Crochet Pattern
Crochet a Five-Point Star Granny Square with this free pattern. Half double crochet rounds, two colors, a 3mm hook, and a 3.5-inch finished square
About this pattern
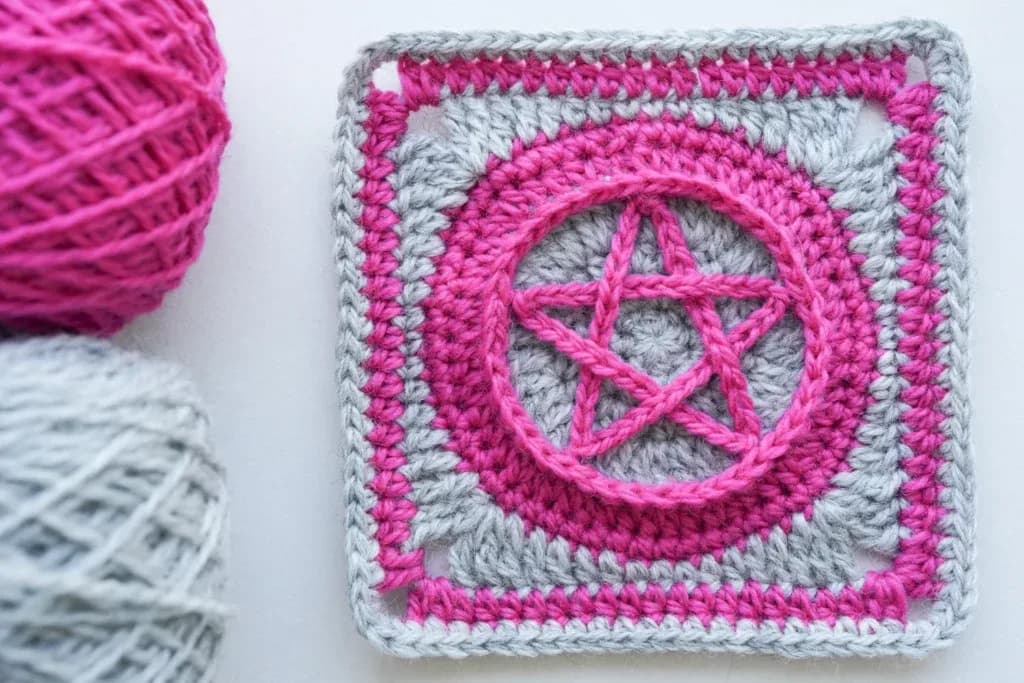
This Five-Point Star Granny Square turns a humble circle of half double crochet into a crisp, star-shaped motif that sits inside a tidy square outline, ready to be joined into blankets, pillows, or bunting. What makes it special is that the points grow organically from evenly spaced increases rather than from fiddly chain loops, so the star stays flat and perfectly symmetrical. It is perfect for crocheters who love classic granny squares but want a motif with a little more personality, whether that is for a celestial nursery blanket, a starry garland, or a stack of quick handmade coasters
The techniques are all friendly ones: a magic ring to start, a ch2 standing stitch that counts as your first half double crochet, hdc increases spaced evenly across each round, slip stitch joins to close every round, and a final round of double crochet increases that pushes the five points outward. Because the whole square is built on half double crochet, the fabric is dense but grows quickly. I would call this an advanced beginner pattern, and most crocheters will finish one square in about 30 to 45 minutes once the first round or two feel familiar and the increase rhythm settles in
Worked with a 3.00mm hook and two colors, the finished star square measures approximately 3.54 x 3.54 inches, which is a lovely small-motif size for joining into larger projects. The hdc rounds give it a slightly cushioned, substantial hand, and the color change lets the star pop against its background. Stack a dozen of them for a baby blanket, make a single one as a coaster or appliqué on a tote bag, or string several together for a garland. They are fast enough to make as thoughtful little handmade gifts for anyone who loves stars and handmade things
Variations
Idea 1
Color is the easiest place to play. For a classic night-sky look, work the inner hdc rounds in a warm gold like Paintbox Yarns Cotton DK in Buttercup Yellow and finish the pointed dc round in navy. For a soft nursery version, try a pale peach star on a cream background, or a dusty rose star with a sage green edge. If you want a rainbow blanket, change color every two rounds so the star grows in concentric bands before the final pointed round, then join all the squares with a neutral border. For size, the pattern scales beautifully because the increases are simple arithmetic. Working the same rounds in a worsted weight yarn such as 24/7 Cotton with a 4.5mm hook bumps the square up to roughly 5 inches, while fingering weight on a 2.5mm hook gives a dainty 2.5-inch star for earrings, keychains, or a delicate garland. To make a bigger star without changing yarn, add one more hdc round before the pointed round, keeping the same spacing logic so each increase falls one stitch further apart than it did the round before; the point round will then need an extra plain dc between each increase cluster so the edges stay flat. Yarn choice changes the mood completely. Scheepjes Catona mercerized cotton gives crisp, sharply defined points for coasters and appliqués; a fluffy blend like Drops Air softens the star into something cozy for winter blankets; and a strand of metallic thread held together with cotton turns it into a sparkly ornament. For seasonal themes, make red and gold stars for a festive winter garland, pastel mint and lilac stars for spring and Eid decor, or deep teal and cream stars for a moody autumn throw pillow
Common mistakes
Leaving the magic ring loose so the center of the star shows a hole or loosens over time
After working the ch2 and 7 hdc into the ring, pull the tail firmly until the center closes completely, then slip stitch to the top of the ch2 before moving on. Weave that starting tail in right away, going through the back of the first round stitches in two directions, so the ring cannot work itself open later when the square is washed or handled
Forgetting that the ch2 standing stitch counts as a half double crochet, which throws off the stitch count from Round 1 onward
The ch2 at the start of every hdc round is stitch number one, so Round 1 should total 8 hdc including that ch2, and each following round should double or increase from that base. Count at the end of every round before you slip stitch to join, and if you are one stitch short, you almost certainly skipped the increase that should have gone into the base of the ch2
Slip stitching into the ch2 chain space instead of the top chain of the ch2, creating a loose, gappy join
Insert your hook under both loops of the second chain of the ch2 (the one furthest from the ring), not into the gap beside it. This gives a firm, flat join that mimics the top of a regular hdc. If your joins look like little ladders running up the square, this is the culprit
Losing track of the hdc, hdc inc repeat so the increases drift and the points end up lopsided or the circle ruffles
Place a stitch marker in every increase stitch on the increase round, then on the next round you can see exactly where the pattern of plain stitch and increase should land. Each increase round should have exactly 8 increases, spaced one more stitch apart than the round before. If the fabric starts to ruffle, you have added extra increases; if it cups, you missed some
Changing to the second color mid-stitch so a blip of the old color shows at the start of the new round
Fasten off the first color after the slip stitch join, then start the new color with a standing stitch by pulling up a loop in the correct stitch and working the ch2 or ch3 from there. This keeps the color change clean and invisible. Leave a 6-inch tail on both colors so you have enough to weave in securely
Materials & abbreviations
Materials
- Yarn of your choice- 2 color
- Crochet hook- we are using a 3.00mm hook
- Darning Needle
- Scissors
Abbreviations
- ch
- chain stitch
- dc
- double crochet
- hdc
- half double crochet
- sc
- single crochet
- tr
- treble crochet
- Sl St
- slip stitch for joining to different round
- ch-sp
- chain space
- st
- stitch
- inc
- increase
- BL
- back loop
- BLO
- back loop only
- FL
- front loop
- FLO
- front loop only
Main pattern
Main Pattern — Round 1
magic ring, ch2 as a standing st(count as hdc), 7hdc, pull the tail tightly, sl st to the top of the first ch2.
Main Pattern — Round 2
ch2 as a standing st(count as hdc), make another hdc in the same st to form a hdc inc, hdc inc in each of the remaining sts, sl st to the top of first ch2.
Main Pattern — Round 3
ch2(count as hdc), hdc inc in next st, *hdc, hdc inc*rep 7 times, sl st to the top of the first ch2.
Main Pattern — Round 4
ch3(count as dc), make another dc in the same st to form a dc inc, dc in the next st, dc inc in the next st, *dc inc, dc, dc inc*rep 7 times, sl st to the top of the first ch3, fasten off.
Main Pattern — Round 5
FLO for this round. add pink yarn into the FL of any st, ch as a standing st, sc in this st, sc in each of the remaining sts, sl st to the first sc.
Main Pattern — Round 6
Work this round in back loops only of Round 4 . add pink yarn into the BL of any st, ch2(count as hdc), hdc inc in the next st, hdc in each of the next 2 sts, hdc inc in next st. *hdc in the next st, hdc inc in the next st, hdc in each of the next 2 sts, hdc inc in next st*rep 7 times, sl st to the top of the first ch2.
Main Pattern — Round 7
ch1 as a standing st, sc in this st, sc in each of the remaining sts, sl st to the top of the first sc, fasten off.
Main Pattern — Round 8
Add gray yarn into any st, ch4(count as tr), tr+ch3+2tr in this st, tr, 2dc, 2hdc, 3sc, 2hdc, 2dc, tr, *2tr+ch3+2tr in next st, tr, 2dc, 2hdc, 3sc, 2hdc, 2dc, tr*rep 3 times, sl st to the top of the first ch4, fasten off.
Main Pattern — Round 9
Add pink yarn in any corner sp. Ch2 as a standing st(counts as hdc), work 1 more hdc, ch3, 2hdc in same corner. hdc in each st for this around, working 2hdc+ch3+2hdc in each corner sp. sl st to the top of the first ch2, fasten off.
Main Pattern — Round 10
Add grey yarn into any corner sp, ch1 as a standing st, 3sc in same corner, sc in each st for this round, working 3sc in each corner sp, sl st to the top of the first sc, fasten off.
- The Five-Point Star Motif Work this round in the front loops only of Round 4.
Important notes
The pattern uses a 3.00mm hook, which is a little smaller than usual for DK yarn. That tighter gauge is intentional: it keeps the star points sharp and the square firm enough to use as a coaster. If your squares come out larger than 3.54 inches, drop to a 2.75mm rather than pulling your stitches tighter
Place a stitch marker in the top of the ch2 standing stitch at the start of every round. Since the ch2 counts as your first hdc, that marker tells you exactly where to slip stitch to join and prevents accidentally working an extra stitch into the join
The increase placement is the whole secret of this star. Every hdc round has exactly 8 increases, and every round adds one more plain hdc between them. Write the round you are on in a note on your phone or use a row counter, because the rounds look very similar once you are past Round 3
For the two-color version, cut the first color only after completing a full slip stitch join, and carry nothing across the back. The star looks best when the color change is crisp, so resist the urge to float the yarn behind the work
The final round of dc increases is what turns the circle into a five-point star, so this is the round to slow down on. Check that the clusters of dc inc, dc, dc inc line up on top of the increases from the previous round; if they are offset, the points will look twisted
Block your finished stars before joining. Pin each of the five points outward on a foam mat, mist with water, and let dry. The hdc fabric responds really well to blocking and the points will stay crisp, which makes joining multiple squares into a blanket far easier
Frequently asked questions
Round 1 gives you 8 half double crochet in total: the ch2 standing stitch counts as the first hdc, plus 7 more hdc worked into the magic ring. If you count 7, you have forgotten to include the ch2; if you count 9, you worked an extra stitch into the ring
Yes, the pattern works in any weight. With a worsted yarn and a 4.5mm or 5mm hook you will get a star roughly 5 inches across instead of 3.54 inches. Just keep in mind the points may be a little softer, so blocking becomes more important
Cupping almost always means you missed increases in one of the hdc rounds. Each round should contain exactly 8 hdc increases spaced evenly apart. Count your stitches at the end of every round and compare to the expected total before you slip stitch to join
Because the final dc round creates five points rather than four corners, the squares join best with a plain round of single crochet or hdc worked around the outside first to create a true square edge. After that you can use any joining method you like, such as whip stitch, slip stitch, or join-as-you-go
One star makes a lovely coaster, an appliqué for a tote bag or cardigan, or a little ornament if you add a hanging loop. Several strung together on a chain make a charming garland for a nursery or a festive winter mantel