Crochet Bunny Lovey Blanket – A Bunny to Love (Free Pattern)
Crochet this adorable bunny lovey blanket with a free pattern — a huggable amigurumi bunny head on a soft 20-inch blanket, perfect for baby gifts
About this pattern
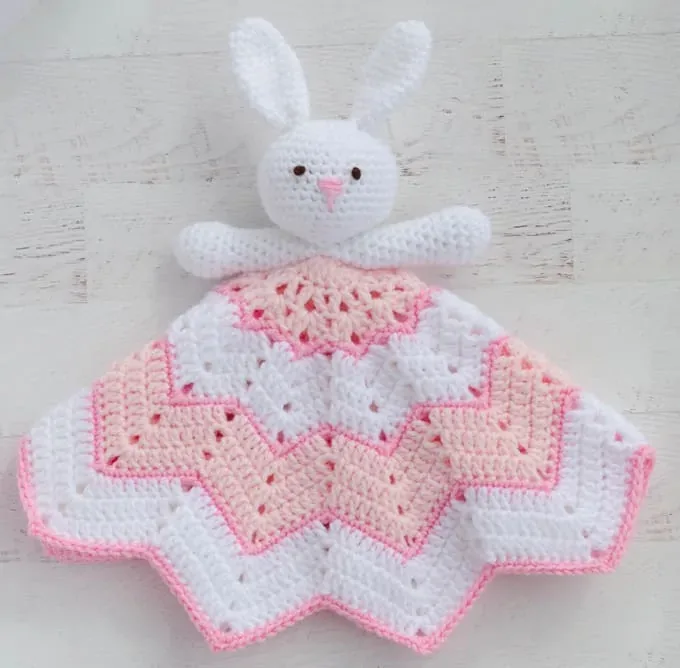
This free crochet pattern creates a bunny lovey blanket — a sweet security blanket topped with a soft amigurumi bunny head, long floppy ears, and two little arms that seem to hug the blanket beneath them. Worked in white with light pink and dark pink accents, it is the kind of project that makes everyone at the baby shower gasp. It is perfect for new parents, first birthdays, or any little one who needs a snuggly companion that is equal parts toy and blanket
You will work the bunny's head in continuous rounds, shape the 14-round ears and 17-round arms in pairs, and crochet the blanket itself across 17 gently increasing rounds until it reaches about 20 inches at its widest point. The techniques are all classics — single crochet, evenly spaced increases, simple color changes, and a bit of stuffing — so a confident beginner can absolutely manage it. Most crocheters finish the pieces in about 4 to 6 hours, plus a little quiet time for the 4 assembly steps at the end
The finished lovey measures roughly 13½ inches when folded (not counting those glorious ears) and about 20 inches across the blanket at its widest point. Worsted weight yarn gives the head a plush, squeezable feel and the blanket a soft drape that tiny hands can grip and drag everywhere. The dark brown embroidered eyes keep everything soft and baby-friendly, while the pink details make it photograph beautifully. Wrap it up with a handwritten care note and you have a handmade present nobody will ever forget
Variations
Idea 1
The white-and-pink palette is classic, but this bunny takes color swaps beautifully. For a gender-neutral nursery, try soft grey with mint and cream — Caron Simply Soft in Soft Grey and Off White, or Vanna's Choice in Silver Grey, gives that plush modern look. A honey-beige bunny with blush inner ears feels wonderfully vintage, and lavender-and-white is pure springtime. Because dark brown is only needed for the eyes, you can substitute black or navy scrap yarn without buying a whole skein. Size is easy to play with, too. Work the blanket's 17 rounds in bulky yarn with a J/6.0 mm hook and everything grows by roughly 25 percent — a toddler-sized snuggler. For a bigger lovey in the same yarn, continue the established increase pattern for 2–3 extra rounds past round 17, checking that the blanket still lies flat. Going smaller, DK yarn with an E/3.5 mm hook makes a petite, stroller-friendly version that uses noticeably less than the 150 yards per color. You can even change the animal entirely. Shorten the 14-round ears to about half their length and round the tips for a bear; make them wider and floppier for a puppy; skip them and add a little loop-stitch mane for a lion. For seasonal gifting, think rust and cream for an autumn baby, icy blue and white for winter, or sunny yellow with white ears for spring. One head-and-blanket recipe, endless bunnies — that is my favorite kind of pattern
Idea 2
I have made more loveys than I can count, and this bunny still makes me smile every single time. The head works up quickly in simple rounds, and there is something deeply satisfying about watching that little face take shape as you stuff it. The ears are my favorite part — fourteen rounds each, worked in pairs, with just enough length to flop over sweetly instead of standing stiff. And those sweet little arms! Sewing them on so the bunny looks like it is holding its own blanket is the moment the whole project comes alive. I also love that the blanket portion is genuinely relaxing in the best way: seventeen rounds of steady, rhythmic increasing you can work while chatting or winding down at night. The color plan is refreshingly simple — white body, light pink and dark pink accents — so there is no fiddly colorwork, just sweet contrast exactly where it counts. Every time I finish one, someone claims it before I can even weave in the ends
Common mistakes
Losing your place in the continuous rounds of the bunny head
Amigurumi rounds spiral without joins, so it is very easy to drift a stitch or two per round and end up with a lopsided head. Place a stitch marker in the first stitch of every round and move it up as you go, and count your stitches at the end of each increase round before moving on
Leaving the starting ring loose before stuffing
A loose starting round will slowly reopen once you pack polyfil behind it, leaving a hole at the top of the head where stuffing peeks out. Pull the starting tail firmly closed before working past round 3, then weave the tail through the opening stitches a second time and knot it on the inside. Give the magic ring that starts each ear the same firm tug
Overstuffing the head so the stitches stretch and gape
Worsted weight single crochet fabric will show white polyfil through the gaps if you cram it full. Stuff firmly at the base so the head sits upright on the blanket, but stop the moment the fabric starts to strain. Roll the head between your palms to distribute the stuffing evenly instead of adding more
The 17-round blanket ruffling or
Ruffling means extra stitches crept in; cupping means you skipped increases. Keep the increase spacing consistent from round to round, count after every round, and lay the blanket flat on a table every few rounds. It should relax flat on its own well before it reaches the full 20-inch width
Mismatched pairs on the ears and arms
The ears take 14 rounds each and the arms 17, and tension drift between the first and second piece is the number one reason pairs come out different sizes. Make each pair back-to-back in the same sitting, with the same hook and mood, and hold them together to compare before fastening off the second one
Embroidering the dark brown eyes unevenly
Freehand eye placement almost always ends up crooked. Before threading your tapestry needle, mark both eye positions with locking stitch markers or pins on the same round of the head, step back and look at the face straight on, and only then embroider. Wrap the yarn the same number of passes for each eye so they match in size
Materials & abbreviations
Materials
- US H8/5.00 mm crochet hook
- Worsted weight yarn: White, Light Pink, Dark Pink, about 150 yards each; Dark Brown (for eyes): 1 yard
- Polyfil stuffing
- Tapestry needle and scissors
Abbreviations
- ch
- chain
- st
- stitch
- sts
- stitches
- sl st
- slip stitch
- sc
- single crochet
- dc
- double crochet
- tog
- together
- ea
- each
- sp
- space
Main pattern
Lovey Blanket — Round 1
With light pink, ch 4, join to form ring, ch 3 (counts as 1st dc here and throughout), 11 dc in ring, join w/sl st to top of beginning ch 3 (12 dc)
Lovey Blanket — Round 2
Ch 3, 1 dc in same st, 2 dc in ea st around. Join w/top of ch 3. (24 dc)
Lovey Blanket — Round 3
Ch 3, *skip next st (1 dc, ch 2, 1 dc) in next st, repeat from * around. End row with a dc in base of ch 3, ch 2, join with sl st to top of ch 3.
Lovey Blanket — Round 4
Sl st into ch 2 sp, ch 3 (1 dc, ch 2, 2 dc) in ch 2 sp, *(2 dc, ch 2, 2dc) in next ch 2 sp, repeat from * around. Join. Fasten off light pink.
Lovey Blanket — Round 5
Attach dark pink to next ch 2 sp. *(2sc, ch 2, 2 sc) in ch 2 sp, 1 sc in next st, skip next 2 st, 1 sc in next st, repeat from * around, end w/sc. Join. Fasten off dark pink.
Lovey Blanket — Round 6
With white, join w/sl st in next ch 2 sp, ch 3 (1dc, ch 2, 2 dc) in ch 2 sp, 1dc in next 2 st, skip 2 st, 1 dc in next 2 st, *(2dc, ch 2, 2 dc) in ch 2 sp, 1dc in next 2 st, skip 2 st, 1 dc in next 2 st, repeat from * around. End w/2 dc. Join.
Lovey Blanket — Round 7
Ch 3, dc in next dc, *(1 dc, ch 2, 1 dc) in ch 2 sp, dc in next 3 st, skip 2 st, dc in next 3 st, repeat from *, end with dc in last st and join.
Lovey Blanket — Round 8
Ch 3, dc in next 2 dc, *(2 dc, ch 2, 2dc) in 2 sp, dc in next 3 st, skip 2 st, dc in next 3 st. Repeat from * around. Join w/top of ch 3. Fasten off white
Lovey Blanket — Round 9
With dark pink, join w/sl st in next ch 2 sp, ch 1, *(2sc, ch 2, 2 sc) in ch 2 sp, sc in next 4 st, skip 2 st, sc in next 4 st, repeat from * around. Join. Fasten off dark pink
Lovey Blanket — Round 10
With light pink, join w/sl st in st before a ch 2 sp, ch 3 (counts as dc), *(1dc, ch 2, 1 dc) in ch 2 sp, 1dc in next 5 st, skip 2 st, 1 dc in next 5 st, repeat from * around. End by dc in last 4 st, join.
Lovey Blanket — Round 11
Ch 3, dc in next dc, *(2 dc, ch 2, 2dc) in ch 2 sp, dc in next 5 st, skip 2 dc, dc in next 5 st, repeat from * around and end by dc in last 3 st & join.
Lovey Blanket — Round 12
Ch 3, dc in next dc 3 st, *(2 dc, ch 2, 2dc) in ch 2 sp, dc in next 6 st, skip 2 st, dc in next 6 st, repeat from * around and end by dc in last 2 st & join. Fasten off light pink.
Lovey Blanket — Round 13
Join dark pink in ch 2 sp, ch1, *(sc, ch 2, sc) in ch 2 sp, sc in next 7 st, skip 2 st, sc in next 7 st, repeat from * around. Join. Fasten off dark pink.
Lovey Blanket — Round 14
Join white in sc before a ch 2 sp, ch 3, *(2 dc, ch 2, 2dc) in ch 2 sp, dc in next 7 st, skip 2 sc, dc in next 7 st, repeat from * around. End row by dc in last 6 st & join.
Lovey Blanket — Round 15
Ch 3, dc in next 2 dc, *(2 dc, ch 2, 2dc) in ch 2 sp, dc in next 8 st, skip 2 st, dc in next 8 st, repeat from * around. End row by dc in last 5 st & join.
Lovey Blanket — Round 16
Ch 3, dc in next 4 dc, *(dc, ch 2, dc) in ch 2 sp, dc in next 9 st, skip 2 st, dc in next 9 st, repeat from * around. End row by dc in last 5 st & join. Fasten off white.
Lovey Blanket — Round 17
Join dark pink in ch 2 sp, ch1, *(2sc, ch 2, 2sc) in ch 2 sp, sc in next 9 st, skip 2 st, sc in next 9 st, repeat from * around. Join. Fasten off and weave in ends
Crochet Bunny Head — Round 1
With white, ch 2, 6 sc in 2nd chain from hook. (6 st) Work in rounds.
Crochet Bunny Head — Round 2
2 sc in ea st (12 st)
Crochet Bunny Head — Round 3
*sc in next st, 2 sc in next. Repeat from * around. (18 st)
Crochet Bunny Head — Round 4
*sc in next 2 st, 2 sc in next. Repeat from * around. (24 st)
Crochet Bunny Head — Round 5
*sc in next 3 st, 2 sc in next. Repeat from * around. (30 st)
Crochet Bunny Head — Round 6
*sc in next 4 st, 2 sc in next. Repeat from * around. (36 st)
Crochet Bunny Head — Round 7-14
sc around. (36 st)
Crochet Bunny Head — Round 15
*sc in next 4 st, sc next 2 st together. Repeat from * around (30)
Crochet Bunny Head — Round 16
*sc in next 3 st, sc next 2 st together. Repeat from * around (24)
Crochet Bunny Head — Round 17
*sc in next 2 st, sc next 2 st together. Repeat from * around (18) Stuff.
Crochet Bunny Head — Round 18
*sc in next st, sc next 2 st together. Repeat from * around (12)
Crochet Bunny Head — Round 19
*sc next 2 st together. Repeat from * around (6 st). Fasten off, leaving a long strand for finishing. Weave through last 6 stitches, pull tight, weaving in ends or knotting of to secure.
Ears (make 2) — Round 1
6 sc into ring (6 sts). Work in rounds
Tip With white yarn, make a magic ring
Ears (make 2) — Round 2
*2sc in ea st, repeat from * around (12 st)
Ears (make 2) — Round 3-5
sc around (12 st)
Ears (make 2) — Round 6
*sc in next 3 st, 2 sc in next st, repeat from * around (15 st)
Ears (make 2) — Round 7-9
sc around (15 st)
Ears (make 2) — Round 10
*Sc in next 3 st, sc 2 tog, repeat from * around (12 st)
Ears (make 2) — Round 11-12
sc around (12 st)
Ears (make 2) — Round 13
*Sc in next 2 st, sc 2 tog, repeat from * around (9 st)
Ears (make 2) — Round 14
sc around (9 st). Fasten off, leaving a long strand for sewing.
Arms (make 2) — Round 1
With white, ch 2, 5 sc in 2nd ch. (5 st) Work in rounds
Arms (make 2) — Round 2
2 sc in ea st (10 st)
Arms (make 2) — Round 3
*sc in next st, 2 sc in next st. Repeat from * around (15 st)
Arms (make 2) — Round 4-6
sc around (15 st)
Arms (make 2) — Round 7
*sc in next st, sc next 2 st together. Repeat from * around. (10 st).
Arms (make 2) — Round 8-17
sc around (10 st). Sl st to next sc and fasten off leaving a long strand for finishing. Stuff firmly, leaving the top ½” unstuffed.
Important notes
Use the recommended US H8/5.00 mm hook, but if your single crochet fabric looks gappy, go down to a G/4.0 mm for the head, ears, and arms only — a tighter fabric keeps stuffing hidden while the blanket can stay soft and drapey at the larger gauge
Stuff the head gradually as the closing rounds shrink the opening. Waiting until the very end means fighting polyfil through a tiny gap, and you will almost always under-fill the top of the head where the ears attach
Leave 12-inch tails when you fasten off the ears and arms. All 4 assembly steps go faster and look cleaner when you sew each piece on with its own tail instead of joining new yarn, and you will have fewer ends to weave in
If this lovey is for a baby, embroider the eyes with the dark brown yarn exactly as the pattern intends rather than swapping in plastic safety eyes, and knot every tail on the inside of the head. Give each ear and arm a firm tug test after assembly
Keep the white, light pink, and dark pink skeins in separate zip bags while you work. The pattern's color changes are simple, but worsted weight strands love to tangle, and clean changes at the end of a round hide much better than mid-round swaps
Choose a machine-washable worsted acrylic since a loved lovey will need frequent baths. About 150 yards of each main color covers the whole project, so one standard skein per color leaves comfortable margin for the ears and arms
This pattern is meant to be a springboard for your own lovey creations. Swap out colors, change the ears and embroidered features to transform the animal, or pair the bunny head with a different blanket style worked in the round — just stop when the lovey is about 18-22 inches across at its widest point, or whatever size looks good to you
Frequently asked questions
The pattern is baby-friendly by design — the eyes are embroidered with dark brown yarn instead of plastic parts, and there are no buttons or beads. Sew the ears, arms, and head on very securely and knot ends inside the head. As with any blanket, supervised snuggles only for the youngest babies
Plan on about 150 yards each of worsted weight in white, light pink, and dark pink, plus a single yard of dark brown for the eyes. That means one standard skein per main color is plenty, with leftovers for a second set of ears if you want to experiment
No — only the bunny head gets polyfil stuffing, packed firmly at the base so it sits up on the blanket. The arms are stuffed firmly with the top half inch left unstuffed for sewing, and the 17-round blanket stays flat and drapey so it folds to about 13½ inches
Yes. Either continue the blanket's increase pattern for 2–3 rounds beyond round 17, or work the whole pattern in bulky yarn with a J/6.0 mm hook for a roughly 25 percent larger lovey. Just remember a bigger blanket may need more than 150 yards of your main colors
A confident beginner can finish this lovey comfortably. If you can single crochet, increase, work in continuous rounds with a stitch marker, and do a basic color change, you have every skill required — the 4 assembly steps are simple sewing with a tapestry needle